Journal Entries
This option is used to record direct journal entries into your accounting records by entering debits and credits for specified accounts.
The option can be accessed by selecting Tasks > Financial > Journal Entries from the main menu or by clicking the Journal button in the Financial section.

The Journal Entries window enables you to enter the journals you require on each line, specifying the account you want and to enter either a Debit or a Credit value. You enter the basic information about the transaction in the top part of the window and the journal lines at the bottom part of the window.
Toolbar
The options on the Toolbar at the top of the window are used to carry out tasks related to the journal entry you are entering or amending :
Click the Save button to record the journal entry you have entered. Once saved, the details will clear ready to enter another transaction.
Click the Save & Close button to record the journal entry you have entered and close the window immediately after completion.
Click the Use Recurring button if you want to retrieve a previously saved recurring entry template to auto-complete the details on the journal entry.
Date
Enter the date for the journal. This will default to today's (sign-in) date. lick the down-arrow button or press Alt+DownArrow on your keyboard to select a date from a calendar.
Reference
Enter a brief reference of up to 20 characters to identify the journal.
Save As A Recurring Entry
Click this checkbox if you want the journal entry that you enter to be saved as a recurring entry template which can be retrieved in the future to avoid having to enter the details again for a similar transaction. If you tick this checkbox you will see a link for Recurring Entry Details. Clicking this link enables you to define the details of the recurring entry that will be saved from this entry.
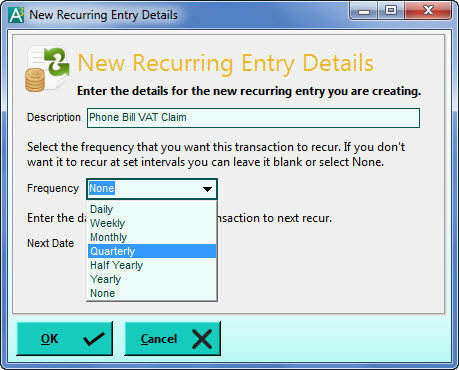
In the New Recurring Entry Details window you can enter a description for the recurring entry and also specify the Frequency. By default the Frequency is set to None indicating it can be used whenever you require it rather being used for a particular period. Click the down-arrow button or press Alt+DownArrow on the keyboard to drop-down a list of available frequencies to select from eg Weekly, Monthly, Yearly etc. If you select a Frequency other than None you can also enter the Next Post date which tells the system when the recurring entry will be next due for processing. Click OK when you are finished.
Lines Toolbar
Above the entry grid is a toolbar which contains key options related specifically to working on entry lines :
Click the Add New Line button to add a new line at the bottom of the existing lines.
Click the Remove Line button to remove the currently selected line.
Click the Insert New Line button to add a new blank line above the currently selected line.
Click the Copy Line button to copy the details on the selected line to a new line added at the bottom of the list.
To enter each line complete the entry grid columns as explained below :
Account Ref.
Enter the reference of the financial account you want to use on this line of the journal entry. You can begin typing the account reference and a drop-down list of matching accounts will be displayed for you to select from. You can also click the down-arrow button or press Alt+DownArrow on the keyboard to display a drop-down list of all accounts. Once an account is selected the account name will be displayed in the Account Name column.
Details
Enter a description of up to 80 characters related specifically to the line that will be recorded for the specified account.
VC
Enter the VAT code for the transaction. This is in the range of 0 to 9. By default each journal entry line will be 9, representing transactions which are unrelated to VAT which journal entries generally are. On occasions where a journal does represent a VAT value and is to be calculated into your VAT return you should specify the relevant VAT code.
Debit
Enter the Debit value for the journal if required. Generally a transaction which debits an account is related to the increase in the value of an asset or the decrease in the value of a liability. For example if you are recording a journal for money coming in to a bank account then you would enter a value in the Debit column. For Profit & Loss accounts a Debit value represents an increase in an expense or a decrease in income.
Credit
Enter the Credit value for the journal if required. Generally a transaction which credits an account is related to the decrease in the value of an asset or the increase in the value of a liability. For example if you are recording a journal for money going out of a bank account then you would enter a value in the Credit column. For Profit & Loss accounts a Credit value represents an increase in income or a decrease in an expense.
For a Journal Entry to be saved the total of the debit values on all of the entry lines must be equal to the total of all of the credits. The Debit & Credit totals are displayed at the bottom of the entry grid as you entry journal lines. If you select to save the journal and the debits and credits do not match you will be given a warning message and asked if you want to save the balancing amount to the Suspense Account (so you can save the entry and later assign the amount to the correct account). Select No if you want to go back and assign the balancing value to a different account.
