Refunds
The Refund option is used to record refund payments to customers and to allocate them against paid invoices or unallocated credit notes and payments.
To access the Refunds option select Tasks > Customer > Refunds from the main menu or through the Customer section by clicking the Transactions button and selecting Refund from the menu.
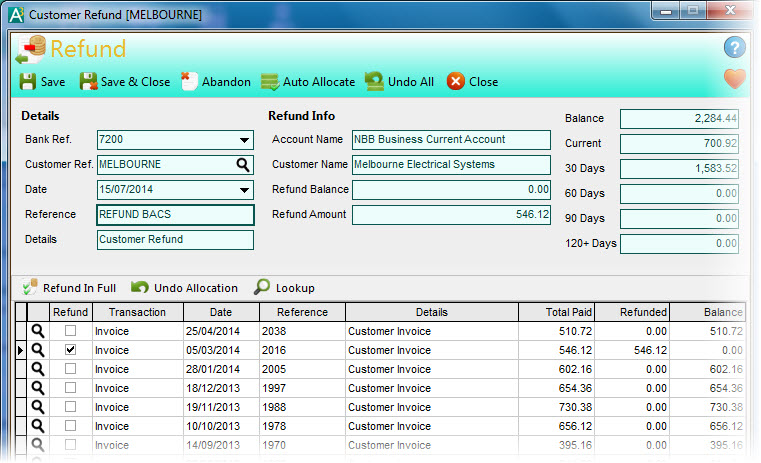
The Refunds window enables you to enter one refund at a time. You enter the information about the refund in the top part of the window and allocate the refund amount against paid invoices and/or unallocated credit notes and payments in the list in the bottom part of the window.
Please note : Unlike Payment transactions where you can record a payment without allocating it, Refund transactions must be allocated and therefore you must allocate all of the refund amount before you can save it.
Toolbar
The options on the Toolbar at the top of the window are used to carry out tasks related to the payment you are entering or amending :
Click the Save button to record the refund you are entering. Once saved, the form will clear ready to enter another refund.
Click the Save & Close button to record the refund you are entering and close the window immediately after completion.
Click the Abandon button to discard any changes made for a refund and all of the relevant entry fields and allocations to be reset.
Click the Auto Allocate button to automatically allocate the refund value you enter (into the Refund Amount box) against transactions starting from the top of the list.
Click the Undo All button to undo all of the allocations you have made for this refund but maintaining the rest of the payment details.
To enter a payment complete the details on the form as explained below :
Bank Ref.
Select the bank account that you want this refund to be recorded to. This will default to the Default Bank Account setting in the Control Accounts page in Company Preferences. Click the down-arrow button or press Alt+DownArrow on your keyboard to drop-down a list of available bank accounts to select from. When you have selected your bank account, the account name will be displayed in the Account Name box under Refund Details.
Customer Ref.
Enter the reference of the customer you want to record the refund for. If you opened this option from the Customer section then the selected customer will be entered by default. Enter the reference directly or click the Look-Up button (magnifying glass) to search and locate the customer you want. Once selected, their name will also be displayed and all of the outstanding transactions for the customer will be loaded into the allocation list at the bottom of the window.
Date
Enter the date for the refund. This will default to today's (sign-in) date. Click the down-arrow button or press Alt+DownArrow on your keyboard to select a date from a calendar.
Reference
Enter a brief reference of up to 20 characters to identify the refund.
Details
Enter a description for the refund of up to 80 characters. This will initially default to the Default Refund Transaction Details setting in the Transactions > Customers/Suppliers page in Company Preferences.
Refund Amount
Enter the amount of the value. If you prefer for the software to calculate the refund amount based upon the total of the transactions that you are refunding then leave this value as zero.
Allocating Transactions
The Refund form is very flexible in the options it provides to refund specific transactions. The transactions in the list are either part or fully paid invoices, unallocated payments or unallocated credit notes. There are two primary ways to refund these transactions :
1) Manual Refund Amount
Enter the refund value in the Refund Amount box and allocate this amount against transactions in the transactions list. You will be able to allocate transactions up to the value of the Refund Amount you have entered. The amount of money still available to allocate at any time is displayed in the Refund Balance box, displayed above the Refund Amount box.
2) Allocation Payment Amount
You allocate the transactions that are being refunded and as you do so the Refund Amount is increased to the total amount you have allocated. To use this method you must NOT manually enter a value into the Refund Amount box. This is especially useful if you do not know the total refund amount during entry but want it to be based on the total of the transactions you select to refund.
Allocating a refund amount is compulsory and the refund amount must equate to the total refund value on the transactions you select to refund.
Whichever method you choose to allocate your refund, the quickest and easiest way to allocate a transaction is to tick it's checkbox in the Refund column. If you have manually entered a refund amount this will fully refund the selected transaction provided there is enough money in the Refund Balance box to allocate it, otherwise it will part refund it with the value remaining in refund balance. If you have not manually entered a refund amount then the transaction will be fully refunded and the Refund Amount will be increased accordingly.
If you want to only part-refund an amount against a transaction then you can manually enter the amount into the transactions Refunded column.

Allocations Toolbar
Above the allocation list is a toolbar which contains key options related specifically to allocating the refund to transactions in the list :
Refund In Full
Click the Refund in Full button to refund the full amount of the highlighted transaction in the list. This performs the same task as ticking the transaction's Refund box. If a Refund Amount has been manually entered the software will allocate the transaction up to the value available in the Refund Balance box.
Undo Allocation
Click the Undo Allocation button to remove any allocation from the currently highlighted transaction. This performs the same task as unticking a transaction's Refund column. If you have manually entered a Payment Amount then this will increase the Payment Balance value to enable you to allocate this value against other transactions.
Drill Down
Click the Drill Down button to look up the full details of the selected transaction. This performs the same function as clicking the Look Up icon (magnifying glass) next to the transaction in the list.
Processing Refunds
When you have allocated your refund against the transactions you want and you save the Refund transaction there are a number of different ways in which the refund is processed based upon the types of transaction you selected to refund.
Paid Invoices
If you have selected to refund one or more paid invoices then the software will record a Credit Note transaction for the total amount of the paid invoices that have been refunded. This will take the details you entered in the Refund form for the new Credit Note transaction and will take the financial account information from the paid invoices in order to reverse the affect on these accounts of the original invoice. It will also record allocation records between the new Credit Note and the invoices being refunded for reference purposes only. The Credit Note transaction will then be fully allocated against the Refund transaction and both will be marked as Allocated.
Unallocated Payments & Credit Notes
If you have selected to refund previously entered payments or credit notes which have not been allocated to invoices then no additional transactions, other than the actual Refund transaction, will be created and the Refund will be allocated directly against the selected payments and credit notes.