Journal Invoices & Credit Notes
This option is used to record invoices and credit notes for Suppliers. Transactions entered in this option are direct accounting transactions which do involve raising documents or entering item lines.
The option can be accessed by selecting Tasks > Supplier > Journal Invoices/Credit Notes from the main menu or by clicking the Transactions button in the Supplier section and selecting the Journal Invoice/Credit option.
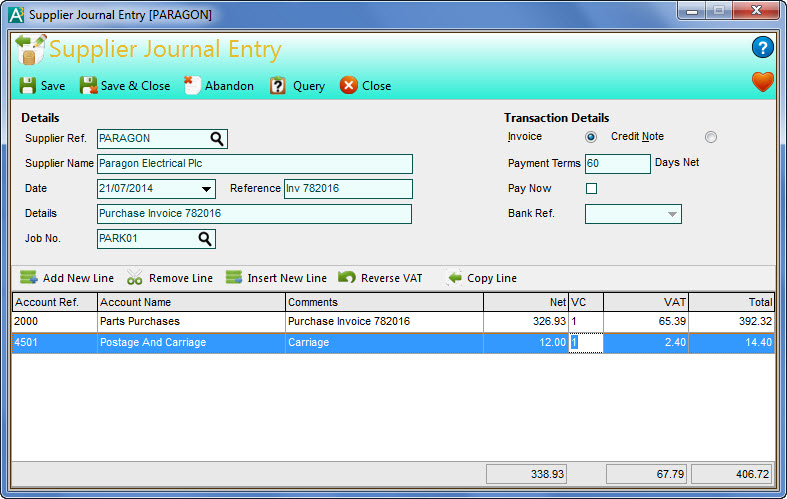
The Journal transactions window enables you to enter one transaction at a time. You enter the basic information about the transaction in the top part of the window and enter the values and the financial account and VAT rate breakdown of transactions in the entry grid at the bottom part of the window.
Toolbar
The options on the Toolbar at the top of the window are used to carry out tasks related to the transaction you are entering or amending :
Click the Save button to record the transaction you are entering. Once saved, the details will clear ready to enter another transaction.
Click the Save & Close button to record the transaction you are entering and close the window immediately after completion.
Click the Abandon button to discard any changes made whether for a new entry or editing an existing.
Click the Query button if you want to mark the new transaction's status as On Query and/or to enter notes about the query or transaction. See the Query Transactions page for more information.
On the right-hand side of the window, under Transaction Details, you can select the type of transaction you want to enter by clicking the option you want. By default Invoice will be selected.
To enter a Supplier journal transaction complete the details as explained below :
Supplier Ref.
Enter the reference of the Supplier you want to record this transaction for. If you opened this option from the Supplier section then the selected Supplier will be entered by default. Enter the reference directly or click the Look-Up button (magnifying glass) to search and locate the Supplier you want. Once selected, their name will also be displayed.
Date
Enter the date for the transaction. This will default to today's (sign-in) date. Click the down-arrow button or press Alt+DownArrow on your keyboard to select a date from a calendar.
Reference
Enter a brief reference of up to 20 characters to identify the transaction.
Details
Enter a transaction detail of up to 80 characters describing the transaction.
Job No. **
Enter the number for the Job you want to assign this transaction to. Using the Job section you can then view the transaction activity for the job. Enter the Job number directly or click the Look-Up button (magnifying glass) to search and select the job you want.
Payment Terms
Enter the payment terms of the transaction in days. By default this will be set to the payment terms on the selected Supplier's record.
Pay Now
If entering an Invoice transaction you can select to pay it immediately when it is saved. If this setting is ticked a payment transaction will also be recorded and allocated to the newly created invoice. The payment transaction will have the same details entered for the invoice.
Bank Ref.
If the Pay Now checkbox is ticked then you must select a bank account that the payment is to be recorded to. Click the down-arrow button or press Alt+DownArrow on your keyboard to drop-down a list of available bank accounts to select from.
The bottom section of the window is used to enter the financial accounts, the values and VAT information about the transaction. Enter one line if the transactions involves only one financial account and one VAT rate. Enter multiple lines if the transaction is broken down into several accounts and/or VAT rates.
Lines Toolbar
Above the entry grid is a toolbar which contains key options related specifically to working on entry lines :
Click the Add New Line button to add a new line at the bottom of the existing lines.
Click the Remove Line button to remove the currently selected line.
Click the Insert New Line button to add a new blank line above the currently selected line.
Click the Reverse VAT button to calculate the VAT inclusive of a value entered into the Net column on the selected entry line. This will then place the resulting values in the Net and VAT columns.
Click the Copy Line button to copy the details on the selected line to a new line added at the bottom of the list.
To enter each line complete the entry grid columns as explained below :
Account Ref.
Enter the reference of the financial account you want to use on this transaction. If the selected Supplier has as Account setting on their record then this will be used as the default account on the first line. You can begin typing the account reference and a drop-down list of matching accounts will be displayed for you to select from. You can also click the down-arrow button or press Alt+DownArrow on the keyboard to display a drop-down list of all accounts If you need to search for an account you can click the Look-Up button (magnifying glass) to show the search window to find the financial account you require. Once an account is selected the account name will be displayed in the Account Name column.
Details
Enter a note or description related specifically to the line that will be recorded for the specified account. This will default to the main transaction details entered. This is useful if there is some additional information you want to record about the specific line within the transaction that will appear in transaction reports and lookups for the account specified.
Net
Enter the net value of the transaction. If you want to use the VAT reverse function then you can enter the total value in here and click the Reverse VAT button to calculate the net and VAT values automatically.
VC
Enter the VAT code for the transaction. This is in the range of 0 to 9 with each code representing a rate at which the VAT is calculated based upon the net value entered. The default for this field depends on whether the selected Supplier has a VAT code defined on their record; if they don't then the standard rate is used.
VAT
Enter the VAT (sales tax) value on the transaction if different than the VAT value calculated for you.
As you add lines to the entry, the transaction totals are displayed at the bottom of the list.