Stock Valuation
This option is used to report on the valuation of your current stock. This provides a report giving you valuations at the average cost price, average sales price and, optionally, all of the three available price levels.
To access this option select Reports > Stock > Stock Valuation from the main menu or click the Reports button in the Stock section and select Stock Valuation from the menu.

On the left hand side of the stock list you have the range panel which is common to all reporting options in Avanti. For this report the range panel involves specifying a range of stock items and/or a range of product groups that you want to see in the list and on the report. hen you have defined the criteria you want, you can hide this panel to expand the width of the stock list by clicking the split-panel bar displayed between the range panel and the list. You can click the split-panel bar again to show the range panel.
Stock
Stock From ... To ...
Select the range of items you want include in the list and report. The item range settings are always defaulted to the first and last stock codes. Enter the stock codes you want directly or enter a partial code or click the Look-Up icon (magnifying glass) in each box to find the stock item you want.
Product Group
Product Group From ... To ...
Select the range of product groups you want to include in the list and report. The product group range settings are always defaulted to the first and last product group references. Enter the references for the product groups you want or enter a partial reference or click the magnifying glass in each box to find the product group you want. Any items not included in the range of product groups you have specified here will not be included in either the on-screen view or the report.
Include Price Valuations
By default the Stock Valuation list and report will include the Average Sales Price (taking the average of the sales prices which are being used) and it's valuation based on current stock levels. You can however also include any of the sales price levels you are using and see the valuation by any of those prices. To select the sales price valuations you want to include in the report use the checkboxes in the Include Price Valuations panel. You can also select and deselect a price to view by right-clicking on the list and the first four options are the prices levels available. To include a price which is not already included, click it and the price and it's valuation are included in the list. Right-click again and the price will have a tick by the side of it. Click it again to exclude it's columns from the list.

Please note : The printed report will only include one sales price and it's stock valuation. By default this will be the Average Sales Price. To include a specific sales price level on the report you must switch off all other prices, including the Average Sales Price, as explained above.
Average Cost Price
The cost price used in the stock valuation is not the current cost price stored on the item but an average of the cost prices of all of the stock you have available. This is calculated using the FIFO (First-In-First-Out) method. This gives a more accurate valuation of the cost of your stock as it uses the actual cost of the items at the time they were received and calculates their average.
Toolbar
The Toolbar provides several buttons which are used to carry out key tasks :
Lookup
The Lookup button is used to look-up the movement history of the selected item.
The Print button is used to produce the Stock Valuation report. The Print button provides a menu of options for you select how you want the report to be produced.
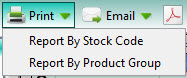
Select List By Product Group if you want to display stock items grouped within their own product groups. Select List By Stock Code to produce a straight list of items.
When you have selected the report that you want, the software will produce the report for you. By default the software will Preview the report it has generated on-screen first and you can then print the report from the Preview window. If you prefer that the software send reports directly to the printer when selecting a Print option then you will need to change the Preview All Reports Before Printing setting in the Reports & Documents page in Company Preferences. See Company Preferences for more information.

The Email button is used to send an email to a specified recipient with a PDF document of the report attached to it. In the same way as the above Print button, the Email button provides a drop-down menu for you to select how you want the report. See the information provided on the Print button for details. Once the report you require is selected and produced you will be given an email window to enter the recipient's email address and the message you want to send with the report. See the Sending Emails page for more information.
The PDF button is used to export a PDF document of the report. In the same way as the above Print button, the PDF button provides a drop-down menu for you to select how you want the report. See the information provided on the Print button for details. Once the report you require is selected and produced you will be given an export window which enables you to make settings about how the want the PDF document exported and whether you want to open it after it has been exported. You can then select where you want to save it and to save it under a specific file name. See the Exporting PDF Documents for more information.
Export
Click the Export button to export the report in the format of your choice. As with the above Print button, the Export button provides a drop-down menu for you to select how you want the report. See the information provided on the Print button for details. Once the report you require is selected you will be given a menu of export options to select the format you want to export the report to. See Exporting Reports for more information.
Refresh
The Refresh button performs a refresh of the information on the list. This is useful if you have left the report to enter or amend transactions (or you are using the multi-user edition and another user has made changes to the data you are viewing) you can use the Refresh button to retrieve the changed information and display it on the list. You can also refresh the data in the list by pressing the F5 button on your keyboard when the list is selected.
Setting the Report Order
You can define the order in which the information on the report appears in the same way as you do in the on-screen list. You simply click the header of the column you want to sort by and this will sort the information for you in the list. The order settings on the list are then picked up by the report to sort the information on the generated report accordingly.
Customising The List
You can customise the list in various different ways including moving columns, sorting the list by a particular column, filtering the list based on your own criteria and more. See the Customising Lists section for more information. Any customisation you carry out on the list is saved, specific to you, so it is displayed in the way you set it the next time you use the Transaction History option.
In the list the first column displays a Look-Up (magnifying glass) icon next to each item. This is used to drill-down to view a movement history for the item. When you click the Look-Up icon it invokes the same process as clicking the Drill Down button in the Toolbar.
You can also access additional options by right-clicking on the list and a pop-up menu will be displayed. This is just another way to get at many of the options available in the Toolbar. The options at the bottom of the right-click pop-up menu, starting from Group By This Field, are standard options for all lists in the software (see Customising Lists for more information). The option at the bottom of the menu is Export which enables you to export all of the information in the list in several formats including Excel, CSV and HTML.