Page Designer
The Document Page Designer is a facility you can use to design the layouts of your standard documents such as invoices*, statements and purchase orders** to your precise requirements. You can incorporate any information you require from the large number of fields made available in the designer, add company logos and other images, change the colours and fonts in the layout to suit your branding and add any other information that you want to print on each document.
The Page Designer is accessed through the Document Designer which enables you to organise your document layouts. The Document Designer can be accessed from the Utilities > Document Designer option on the main menu.

1) Page Layout
The Page Layout is the area of the page designer that is the actual surface of the document you are designing. You lay out your document by dropping "objects" on the surface, whether they be Field objects containing information from the document being printed, Text objects that display any additional text you want on the page, Picture objects that display images such as your business' logo or Draw objects which enable you to draw lines, boxes or circles on your page.
The Page Layout is split into "bands". Bands are areas of the page that are printed in different circumstances. You drop the objects into the relevant band on the page depending on when and where you want it to be printed. Generally any documents you are designing are given pre-defined bands for you to layout your design around. The name and type of band is displayed in a coloured panel at the top of each band.
The screenshot below shows an empty invoice* document with the standard bands displayed in order to highlight the format of the page. Although this is an invoice* document the same principle apples to all documents including statements and purchase orders***.

Please note : You must not place or move objects on the page layout outside of one of the provided bands. Any objects which are placed outside of a band will not be included in your document when produced and may cause the software to raise an error message when attempting to produce the document.
GroupHeader band
The GroupHeader band is printed when a new invoice (or other type of document) is encountered. You generally want this to print the header information at the top of each invoice*, statement or purchase order*** such as your company name and address, the type of document, the customer name and address, invoice number etc. The default setting is to print the information in the GroupHeader band on every page in the invoice, statement etc. However if you just want to print the header information on the first page of each document you can right-click on the band surface and you will see an option for Reprint On New Page which is ticked. You select this option to turn this setting off and the header information will not be printed on each subsequent page of the document.

If you are using pre-printed stationery with your company details and logo etc already printed on the page you should resize the GroupHeader band and leave a large enough space at the top so nothing it printed over the printed header on the stationery.
MasterData band
The MasterData band is printed for each line on the document. For invoices* and purchase orders*** this is for each item line, for statements this is for each transaction. In the MasterData band you include the fields and objects that make up one line in the document. The information in this band will be repeated for every line on the document down the page. The number of times this is printed on each page is dependant on the size of the MasterData band and the amount of space available on the page taking into account the header, the footer and the physical page size.

GroupFooter band
The GroupFooter band is used to print information that you want at the bottom of each document. For invoices this may include the transaction totals, notes, terms and conditions etc. For statements this may be the customer's aged balance etc.

PageFooter band
The PageFooter band is used to print on the bottom of every page. This may include page number etc.
2) Toolbars & Menus
The toolbars and menus are used to carry out key tasks in designed your layouts. The menu and the top level toolbar are used to define settings and carry out tasks related to the entire document layout. For example to Save changes, preview the document, copy & paste, undo & redo, set the view size and more.

The bottom level toolbar is related to the currently selected item or "object" in the page layout. For example if you select a Text object in the layout the toolbar will make font and font styles and colour buttons available for you to select.

3) Object Selector
The bar displayed down the left-hand side of the page designer window is used to add different types of objects to the page to display different elements in your document. For example you would add a text label to display some text in the page. You would add a picture to display an image. The three objects that you will use almost exclusively in designing your layout are the Text object (identified by the large A), the Picture object (identified by an image and displayed directly beneath the Text object) and the Draw object (displayed at the bottom of the object selector) which allows you to draw lines and various other shapes such as boxes and circles on the page.

To add an object to the page you click the button for the type of object you want in the Object Selector. Move the mouse to the position on the page that you want to place the object, click on the position and then drag the mouse to size it.
Adding a Text object
You add a Text object to the page where you want to add text to the layout. Once you have added the Text object to the page (see above) you will be given a window where you can enter the text you want.
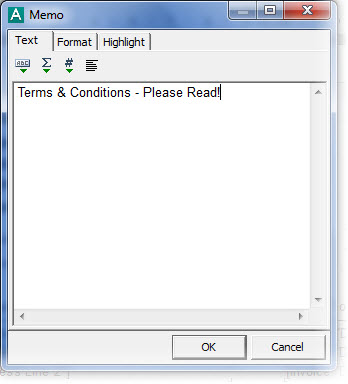
You enter the text you want to see on the page into the notepad and click OK when you are done. The buttons above the notepad are useful for including more involved expressions such as calculated values. These are explained in more detail in the Adding Calculated Fields section later in this page. The button on the right can be clicked if you want to word-wrap the text as you enter it into the notepad. The text will be word-wrapped in the object when displayed on the page by default.
There are two other tab pages in the Memo window, Format and Highlight. The Format tab is used to format text in a specific way for currency values, dates etc. You will use this primarily when adding custom or calculated fields to the page which is explained in Adding Calculated Fields later in this page. The Highlight tab is used to highlight the text in this object if it meets a certain criteria. For example if you have a text object which includes the payment terms and you want highlight it in bold and red if the payment terms have been exceeded when you produce the document. This is explained in full in the Highlighting Text section later in this page.
If you want to edit the text in the object later you can right-click on it and select Edit from the pop-up menu. Once text is added you set it's font, style, size and colour and any other settings by using the 2nd level toolbar as explained in section 2).
Using Frames
Frames are used to place lines around the text in a Text object. Using the frames options in the toolbar you can place frames above, below, left and right of the text object or frame the whole object. You can then set the background colour of the frame, put a shadow around it, set the style of the frame lines and set the size of the frame lines. The frames options are available on the far right of the 2nd level toolbar as pictured below.

Adding a Picture object
Adding a picture object to the page layout enables you to include an image in your document. This is useful to include your business logo or for adding other images such as credit card images or logos of trade or quality accreditations etc.
Add the object to the page as explained earlier. Do not worry about the precise size that you set it to as this can be changed later. Once added and sized you will be presented with a window to define the image you want to add. There are 2 ways to specify the image you want. You can paste an image if you have previously copied it your clipboard. To paste the image you click the Paste button in the toolbar at the top of the Picture window and the image in your clipboard will be added.

You can also add an image from a file. To do this click the open (folder) button to the left and you can browse and select the image that you want.
Once selected it will be displayed in the main area in the Picture window. Don't worry at this point if the image doesn't look particularly nice in this window as we can change that later. Once you have added your image from your clipboard or from a file you should click the Tick button.
By default your image will be stretched to fit the picture object on the page. This means that if the image is smaller than the size of the object on the page then it will be stretched to fit the size of the picture object and if the image is larger than the picture object then it will be shrunk to fit. If you want the image to always display in it's original size then you can right-click the picture object and select the Auto Size option on the pop-up menu. This will ensure that the picture object is the same size as the image with no stretching involved. To avoid any stretching (or shrinking) of the image you should also right-click on the picture object and select Stretch from the pop-up which will turn off any image stretching.
Improving the quality of your image
If you require to resize the picture object in order to resize how your actual image will appear on the page you should not select either the Auto Size option or turn off Stretching. As you stretch or shrink an image it will inevitably lose some of it's quality in the process. You can mitigate this quality depreciation by making additional settings on the image.
To make these settings you will need to use the Property Inspector. The Property Inspector is hidden by default. To display it press F11 on your keyboard or click the split-panel button on the left as shown in the screenshot below :
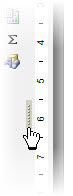
The Property Inspector will then be displayed on the left-hand side of the layout page.

The two properties we're interested in for the picture object are HightQuality and KeepAspectRatio. Whether you intend to resize your image or not we recommend setting the HightQuality property to True by ticking the checkbox next to it. If you are resizing the image then ticking the KeepAspectRatio checkbox is important to keep as much of the integrity of the image as possible as you resize it.
When you have finished if you don't want to keep the Property Inspector displayed you can press F11 on your keyboard again or click the split-panel button again which will be displayed just to the right of the Property Inspector.
Adding a Draw Object
The draw object enables you to draw shapes onto your page. These can be lines, boxes, circles, triangles etc. When you click the Draw object button in the Object Selector (explained earlier) you are given a menu to select the type of shape you want to draw on the page.

When you have selected the type of shape you should click on the position on the page where you want to place the shape and drag it to size it. You can resize it again later if you do not initially set the size that you want.
4) Field List
The Field List displayed on the right-hand side of the page designer, under the Data tab, contains a full list of all of the fields available to be included in your document. The fields available will differ depending on the type of document you are designing. The screenshot below shows the field list when designing invoices.
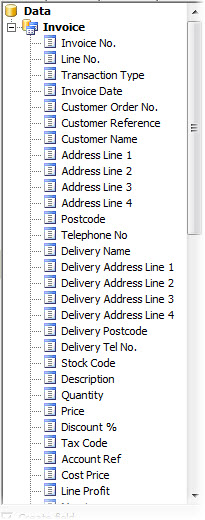
Invoices* and Purchase Orders***
All fields in the list above Stock Code and below Items Total are fields that relate to the entire transaction. All fields listed between and including these are fields that relate to individual lines. Generally fields that are related to individual lines should only be added to the MasterData band. Fields that are related to the entire transaction should be placed on either the GroupHeader or GroupFooter bands as you deem appropriate.
Statements and Remittance Advice Notes
All fields in the list above Trans Type are fields that relate to the entire document. All fields from Trans Type below relate to individual transactions on the document. Generally fields that are related to individual transactions should only be added to the MasterData band and fields that relate to the entire document should be place on the GroupHeader or GroupFooter bands as you require.
Adding Fields
To add a field to the page you simply click on it in the field list and drag it to the position on the page and the band where you want it to be displayed. If you want to add a caption when you add the field onto the page tick the Create Caption checkbox under the field list, drag the field onto the page and a separate Text object will be added for the field and displayed above it. There may be circumstances where you only want to place the caption for a field on the page but not the field itself. In that instance you untick the Create Field checkbox, tick the Create Caption checkbox and drag the required field onto the page.
Fields Are Text Objects
When you add a field to the page you are effectively adding a Text object which points to a field. You will notice that when you add a field to the page it displays text similar to this :
[Invoice."InvoiceDate"]
Why does it display like this and how does it work? The square brackets which surround the text label are used to tell the software when producing the document to not directly display the actual text on the object but to review the text inside the square brackets. Inside the square brackets are two pieces of information either side of a dot. The text to the left of the dot tells the software that it wants to include a field from an Invoice. The text to the right of the dot, surrounded by double-quotes, tells the software the actual field from an Invoice that should be displayed. Therefore when generating the document, the software knows that it needs to look somewhere else for the text (square brackets) and then where to go and find that information and then print it. This method of including fields when designing the page enables additional functionality such as calculated fields which are explained later.
Adding Variables
Variables are pieces of information that can be useful to add to the document that are not part of the field data. For example variables enable you to add your own company name and address to the document as well as system variables such as today's date, page number and more. The Field List is part of the Data tab. You will notice that there is a tab for Variables. Click the Variables tab and the list of available variables which you can add to your document will be displayed.

In the same way you can a field, you simply click the variable that you want to add and drag it to the position on the relevant band on your page layout.
Aligning Objects
The page designer includes a useful guide for correctly aligning the field objects on the page. As you move your field object (indeed any object) on the page, if the object becomes aligned with another object on the page, whether vertically or horizontally, a blue line will appear displaying the alignment to the other object. This is very useful as it can be used as a guide when moving or dragging objects on the page to ensure that the objects that you need to be aligned are correctly positioned.

Precisely Positioning Objects
As you move objects around the page, each movement shifts the object by a specific amount which is 1mm (or 0.10 in the property inspector). If you need to move the object to a more precise position than moving it in 1mm increments with the mouse you can select the object you want to move, press and hold the Ctrl key on your keyboard and press the relevant cursor key (up, down, left and right arrows) to move it very slightly (in 3/10ths of a millimetre increments) in the direction you want. To position an object even more precisely you can enter the specific Left or Top property in the Property Inspector with a precision of 1/10th of a millimetre by specifying a precision of 0.01 for the relevant property. Please note : Unless other objects on the page have also been moved precisely using these precision methods, they will be positioned in 1mm (0.10) increments and as such can never be aligned to objects that are not set to the standard 1mm positioning. In this case the alignment guides (explained above) will not apply to the object you have precisely positioned.
Sizing Objects
To size an object you can click to select it on the page and drag one of the edges of the object with your mouse. Each position you move will increase or decrease the size of the object by 1mm (or 0.10 in the Property Inspector). To size an object using the keyboard you can hold down the Shift key and press the relevant cursor key to resize it. Press the down arrow key to increase the height and the up arrow key to decrease the height. Press the right arrow key to increase the width of the object and the left arrow key to decrease the width. Please note : Whether you size an object using the mouse or the keyboard, it will always be resized in 1mm increments (0.10). To more precisely define the size of an object up to 1/10th of a millimetre you will need to specify it's Height and Width properties manually in the Property Inspector.
Resizing The Lines Band
The size of the lines or the MasterData band will determine the size of each line that is produced on the final document. By default the document will always adjust the size of this band to the size and positioning of the objects that are contained within it. If you want to expand the size of the MasterData band or to shrink it ie to show lines closer together you will need to remove this default. To do this, select the MasterData band on the page and open the Property Inspector (as explained earlier). Look for a property called Stretched. Untick the Stretched property and then manually enter the required height of the MasterData band into the Height property. This will override automatic sizing and will take the Height property literally when deciding the height of the lines band on the finished document.
Previewing Your Document
As you design your document you may want to see how it's going to look. You can do this by clicking the Preview button on the top level toolbar (as shown below).

Please note : The preview works by using data in your company data file. If you are setting up your documents before entering any information for your company then no documents will be displayed in the preview as there is no data to work with. In that instance you should save your changes, close the page and document designers, go to the main File menu, select Change Company and select Sample Company. Go back into the designer and you can complete your design using the sample company's data to preview your document.
Adding Calculated Fields
There may be circumstances where you want to add some information to a document that is not included as a standard field but can be derived by calculating two or more of the fields available. These are called Calculated Fields. An example of using a calculated field is to display the outstanding amount owed on an invoice. There is no standard field included for this however you do have the invoice total and the amount paid so we can derive the outstanding amount owed using a calculated field.
You start by adding a standard Text object to the page (as explained earlier). In the Memo window you click the first button on the toolbar above the notepad box. This is the Insert Expression button and will display the Expression Editor window.

The expression editor lists all of the available fields. To add a field to an expression (or calculation) you simply double-click it in the list. For our example we will double-click the Invoice Total field. You will notice an Expression box at the bottom of the window and our field will be displayed.

We're entering a calculation so we must enter the operator we want to add into the calculation so we enter a minus sign after the field text added automatically for us. We now can go back to the list of fields and double-click the Payment Amount field. Our expression box will now look like this :
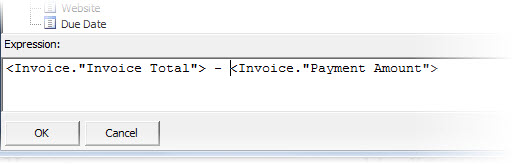
This calculation (Invoice Total - Payment Amount) will give us the outstanding amount owed on the invoice. Click the OK button.
Back in the Memo window the expression has been added as shown below :

Click the OK button and our expression is included in the Text label.
Formatting The Text Label
As explained earlier all fields, including calculated fields, are displayed as text. In this example however we've defined an expression which will return a number which we want to display as a currency with two decimal places. We must therefore tell the Text object to display the resulting number in the format we want. To do this right-click on the object and select Display Format... from the menu.
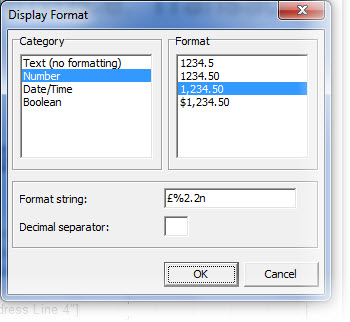
This will show the Display Format window. On the left hand-side you have the Category list which shows all of the main types of formatting. Click the Number option. On the right-hand side, under the Format list, you have a number of options. Click on the third option down (1,234.56). This is the format that we want to display the outstanding amount owed. If you look at the Format String box you will see %2.2n. If you also want to have a £, € or $ in the number enter it into the Format String box before the % symbol ie £%2.2n. Click OK when you are done.
Highlighting Text
The page designer offers you a way to highlight the text in a Text object based upon a set condition or expression. For example if you want to display details of your payment terms but want to highlight them in red if the payment due date is exceeded. Remember a Text object can be a field as a well as a standard object displaying text.
Right-click on the Text object to you want apply highlighting to and select Edit... from the menu. When the memo window displays click on the Highlight tab.

The way to add a highlight is to add the condition of the highlight in the Condition box and set the font style and colour if the condition is met using the settings below it. You can enter a condition directly into the Condition box but generally you will click the fx to the right of the Condition box which will call the Expression Editor to help you define the highlight criteria.
In our example we will add a condition to highlight the text on a red background in white text and in bold if the date that the document is printed is on or after the payment due date. To do this click the fx button to the right of the Condition box. In the Expression Editor we have our list of fields in the Data tab. As we need to compare the date that the invoice is produced we need to have access to the system date. This is not in our fields list. The expression editor does have the facility to access information such as the system date by using Variables. For a list of available variables click the Variables tab.

Variables are pieces of information that can be useful to add to the document or to set expressions which are not part of the field data. As you can see from the screenshot, variables can include your own company details that you can use on your layout. Under System Variables you will see a variable called Date. To add this to our condition, double-click on Date and it will be added to our expression box displayed at the bottom of the window.
We want to compare if the date that the document is produced (contained in the variable Date) is on or after the payment due date. To compare dates in this way we use the "greater than or equal to" operator which is >= . Enter this in the expression box after the Date variable so it reads :
<Date> >=
Finally we need to add the payment due date on the invoice. Click back to the Data tab and look for a field called Due Date and double-click it to add it to the expression box. Once done Click OK. Back in the Memo window you should see a Condition similar to the following screenshot.
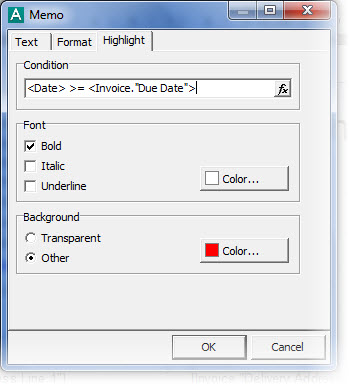
We now define how the text for the object is to be displayed if the above condition is met. In this case we want the text in bold in white on a red background. In the Font section tick the Bold checkbox, click the Color button and select white from the colour palette. In the Background panel, select the Other option, click the Color button and select red from the colour palette. Click OK when you're done.
To give you an idea of how this works, here are two results from the highlight condition we've set. The first is from a document where the condition is met and the second is from a document where it is not met.
Our Payment terms are strictly 30 days net.
Our Payment terms are strictly 30 days net.
Page Settings
If you want to adjust the settings of the document you are designing such as page size, margins or orientation you can use the Page Settings option. To access this click the Page Settings button in the main toolbar as shown below :

The Page Options window will then be displayed.

The first prompt asks you to set the size of the page. Use the drop-down arrow button to view a list standard page sizes such as A4, A5 etc. When selected the page size will be displayed in the Width and Height boxes. If you want to enter a non-standard page size you can enter the dimensions directly into the Width and Height boxes.
Next you have the option to define whether you want the orientation of the page to be Portrait or Landscape. Portrait is the default option.
You can then specify the margins of the page. We recommend that you do not set the margins below 1cm as some printers have difficulty printing documents with margins less than 1cm.
When you are finished making you page settings you can click OK or click Cancel to discard any changes.