Purchasing ***
The Purchasing section is a control-panel which enables you to view a list of all of your purchase document transactions including purchase orders and invoices and to access all of the features available for entering, printing, processing, enquiring and reporting on purchase document transactions.
You can access the Purchasing section by clicking the Purchasing option in the main Options Bar at the top of the Avanti application window.
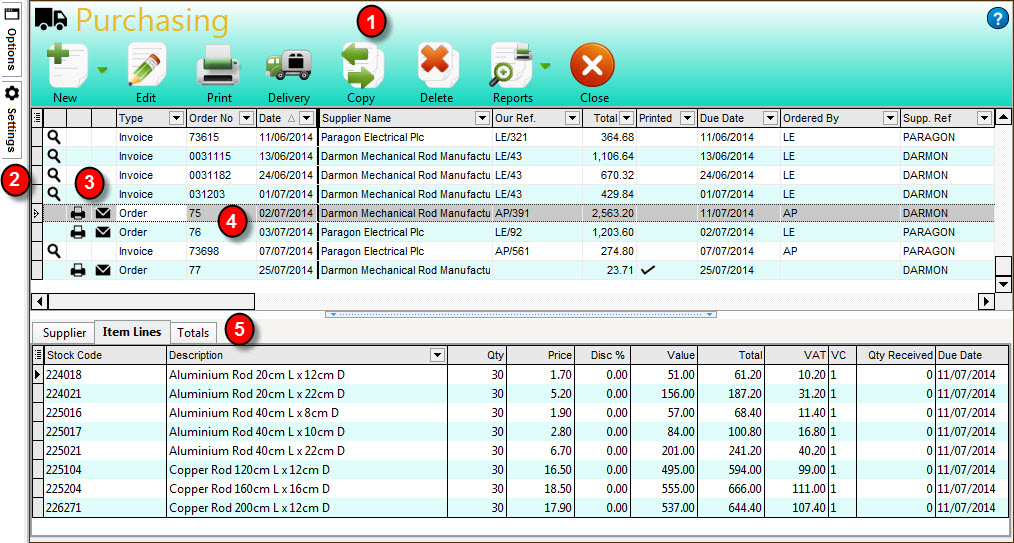
1) Toolbar
The Toolbar gives you quick access to the main options in the Purchasing section.
The New button is used to enter a new purchase transaction. If you click the main part of the button, to the left of the down-arrow, you can enter a new purchase order. If you click the down-arrow part of the button on the right you will be given a menu to select the type of transaction you want to enter and you can select accordingly. See Purchase Order & Invoice Entry for more information.
The Edit button is used to view and/or amend the currently selected transaction in the main Purchasing list.
The Print button is used to batch print a range or a selected list of purchase orders. See the Batch Print page. For more information on selecting a list of orders to print see the Multi-Select page.
The Deliver button is used to receive goods into stock from previously entered purchase orders and, optionally, to record a purchase invoice for the goods received. See the Receive Deliveries option for more information.
The Copy button enables you to copy the details of an existing transaction to a new purchase transaction. See the Copy option for more information.
The Delete button is used to delete a range of transactions, a single transaction or a selected list of transactions. See the Delete option page. For more information on selecting a list of transactions to delete see the Multi-Select page.
The Reports button provides a drop-down menu of reports available specifically related to purchase document transactions. See Purchase Order Reports for more information.
2) Pop-Out Task Bar
The pop-out task bar is a quick and easy way to view and access all of the options available in the Purchasing section. You just roll your mouse over the Options tab on the left-hand side of the Purchasing section and after a second the panel will pop-up from the left displaying all of the options available for you to select from. If you move your mouse away it will pop back into it's tab.

There are two sections in the Options tab, Tasks and Enquiry. Tasks gives you all of the types of common tasks you can carry out. Enquiry gives you all of the options to print and enquire about purchasing transactions and to produce reports.
The second tab is Settings which gives you an Attachments checkbox. If you tick the Attachments box an additional column is added to the left of the purchase transaction list which is used to display which transactions have any attachments. If a purchase transaction has one or more attachments a paperclip icon will be displayed in that column. You can then click this column next to the relevant transaction to add, view, open or remove attachments for their record. You can also add or view attachments by right-clicking on an item and selecting Attachments from the pop-up menu. See Attachments for more information.
3) Quick Print & Email
For purchase order transactions there are two columns on the left which contain icons. Clicking any of these icons enables you to perform a quick task on the selected order.
Quick Print
Click the first column which contains the printer icon and you can quickly print the selected purchase order. This will display the Quick Print window where you can select the layout you want to print. See the Quick Print page for more information.
Quick Email
Click the second column which contains the envelope icon and you can quickly email the selected order. This will display a window to select the layout you want to email and you can then specify the recipient's name and email addresses. The supplier's details will be entered for you by default. See the Quick Print page.
Quick Printing or Emailing Multiple Transactions
The Quick Print and Quick Email facility provides a great way to quickly print or email a transaction. However it also offers the facility to cherry-pick and select any number of purchase orders that you require and to use the Quick Print function to print or email all of the selected orders in a single step. To do this you will use the Multi-Select facilities in the Purchase list to pick all of the purchase orders that you want to print or email. For how to select a list of transactions see the Multi-Select page. Once you have selected all of the orders you want to print or email, right-click on any selected transaction and select Print Orders or Email Orders from the pop-up menu. The list you selected will then be passed in to the Quick Print facility for you to carry out the required process. See the Quick Print page for more information.
4) Transaction List
Displays a full list of all of your purchase document transactions providing all of the main details of each transaction.
You can customise the list in various different ways including moving columns, sorting the list by a particular column, filtering the list based on your own criteria, displaying more columns or hiding existing columns and more. See the Customising Lists section for more information. Any customisation you carry out on the list is saved, specific to you, so it is displayed in the way you set it the next time you use the Purchasing section.
You can also access additional options for the Purchasing section by right-clicking on the list and a pop-up menu will be displayed. This is just another way to get at many of the options available in the Purchasing section.
An additional option on the pop-up menu is the Attachments option (as mentioned earlier). Selecting this option will open the Attachments window enabling you to add, view, open and remove file and web-link attachments for the selected purchase transaction.
The options at the bottom of the right-click pop-up menu, starting from Group By This Field, are standard options for all lists in the software (see Customising Lists for more information). The option at the bottom of the menu is Export which enables you to export all of the information in the list in several formats including Excel, CSV and HTML.
5) Detail Split-Panel
The panel at the bottom of the Purchasing section is used to display the full details of the selected purchase document transaction. As you move through transactions in the main list the information displayed in the Detail Split-Panel will refresh to display the details of the current transaction.
The Detail panel contains three tabs, Supplier, Item Lines, Totals. The Supplier tab displays information regarding the supplier and general information about the transaction. The Item Lines tab shows all of the lines on the transaction display stock info, description, price, quantity, discounts, and totals. The Totals tab displays the full totals of the transaction.
You can hide the Detail panel, if you prefer to expand the list and display more transactions, by clicking the horizontal split-panel bar underneath the transaction list (as shown below).

To show the Detail panel again click the split-panel bar which will now be displayed at the very bottom of the Purchasing section. You can resize the details panel by clicking the split-panel bar and dragging it up or down to position it how you want. The display of the Detail panel will be saved and used the next time you open the Purchasing section.