Purchase Order & Invoice Entry ***
This option is used to enter purchase orders and purchase invoice transactions.
You can access this option by selecting Tasks > Purchasing > Purchase Orders or Purchase Invoices from the main menu or click the New or Edit buttons in the Purchasing section. Alternatively you can click the Transactions button in the Supplier section and select Invoice from the menu.

The purchase order and invoice entry window is designed to make recording your purchasing transactions as quick and as simple as possible.
Selecting the Transaction Type
The first thing to do when entering a transaction is to select the type of transaction you want to enter. The default transaction type is displayed in large font in the top left of the form. To change the type click the down-arrow button to the right of the current transaction type and a drop-down menu of the available types will be displayed and you should select accordingly. If you select Purchase Order the number of the new order will be displayed.

Selecting A Supplier
In the Supplier Ref. box you can enter the reference of the supplier you want to raise the transaction for. If this to be for a new supplier you can click the New button on the main system toolbar and select Supplier from the menu. To select an existing supplier enter their reference directly if you know it. Alternatively enter a partial reference or click the magnifying glass button to the right of the Supplier Ref. box to do a lookup search to find the supplier you want.
Once you have selected a supplier, their name and address will be displayed in the box below the Supplier Ref. box. If you want to show more information about the selected supplier such as their telephone number, email address, balance and even their recent transactions you can click the Show Supplier Info link in the top right of the form. See the Info Panel section explained later in this page for more information.
Generating An Invoice From Received Purchase Orders
If you have selected to enter a purchase invoice and want to automatically generate that invoice from a purchase order that has been fully or part received (using the Receive Deliveries option), you will be given a link which takes you to facility to select the order(s) and the items that have been received that you now want to raise a purchase invoice for. Click the Create Invoice From Purchase Order link (as shown below) and you will be presented with the window to select the received order lines that you want to record a purchase invoice for. See the Selecting Received Orders To Invoice section.

Delivery Address
If you have assigned a standard delivery address for the selected supplier, it will be displayed in the box under Deliver To :
If you want to use another delivery address that is already assigned to this supplier you can click the down-arrow button next to the Deliver To : prompt to see a list of the available delivery addresses and select accordingly.
If you want to manually enter a different delivery address you can simply enter it into the Deliver To : box. Please note : If you manually enter an address into the Deliver To : box this delivery address will be saved for the transaction but will not be saved to the Supplier's record to be used again. If you want to record a delivery address which can be used again for this supplier's transactions then you should enter it on the supplier's record so it is available for selection on future transactions. See Supplier Details for more information.
Transaction Number
If you have selected to enter a Purchase Order then a number for the new order (or transaction being viewed or edited) will be displayed in the Purc. Order No: box. If you have selected to enter a purchase invoice or credit note then you can manually enter the number for the transaction as provided by your supplier for your reference.
Date
Enter the date that the transaction will be recorded on. Click the down-arrow button or press Alt+DownArrow on your keyboard to select a date from a calendar.
Job No.
Enter the Job Number that you want to assign this transaction to. This will enable you to track sales transactions by a specific job. Enter the number for the job directly if known or enter a partial number or click the magnifying glass button to do a search lookup for the job and select accordingly. The job specified here will be assigned as the default for the entire transaction however you can assign different job numbers to different lines on the transaction if required.
Order Reference
Enter an additional reference if required to identify the transaction.
Ordered By (Purchase Order Only)
Enter a reference to identify the person responsible for placing the order eg the person's initials etc.
Due Date (Purchase Order Only)
Enter the date that the items on the order are due for delivery. Click the down-arrow button or press Alt+DownArrow on your keyboard to select a date from a calendar.
Entering Transaction Lines
The main part of entering a purchase transaction is to enter the line information. Each line can represent an item sold from stock, from a product list or a free-text line for detailing a service provided or the sale of an add-hoc product. For each line you can enter a quantity, a price and the values for each line and for the entire transaction are calculated for you.
Toolbar
The Toolbar displayed above the entry grid provided options specifically related to the line you are working in. The buttons provided are explained below :
 The magnifying glass option in the toolbar is used to invoke the Quick Item/Product Search which is a facility to help you find and select the items that you want to include on the current transaction. The Quick Item Search option enables you to perform a more in depth search for your stock items including listing the most recently ordered items and the items you have purchased the most from the supplier. The facility enables you to select several items at once to add to the transaction if required. For more information see the Quick Item Search topic.
Add New Line
This button adds a transaction line to the entry grid at the bottom of all existing lines. You can then complete this details for this line as will be explained below.
Add Free Text Line
Clicking this button will add a transaction line to the entry and pop-up the free-text notepad window for you enter the full description for the new line into. The new line will be added to the bottom of all existing lines in the entry grid.
Remove Line
This button will delete the currently highlighted line in the entry grid.
Reverse VAT
Click this button if you want to calculate the price column for the current line to be inclusive of VAT. This will reserve the price so that the value shown in the price column will then be VAT exclusive. This is useful if the price you want to enter is inclusive of VAT and saves you from having to calculate the net value manually. This is not a toggle option and each time you press it the VAT will be calculated inclusive of the current value in the price column and the price reduced accordingly.
Edit Description
Click this button if you want to edit the description of the current line in a free-text notepad where you can enter an unlimited amount of text for the description. This can be used for both stock / product and free-text lines.

Line Details
Each line is entered on one row of the entry grid. The first column is for a Stock Code. This can be entered if you want to record a stock item or product on the line. If you do want to record a stock item or product on the line you can leave the Stock Code empty and just press TAB or Enter on your keyboard. In this case the Description column will be available for you to enter a free-text description of the service or product you require. If you want to enter a long description you can click the Edit Description button on the toolbar above the entry grid and this will display a free-text notepad for you to enter as much text for the description as you require.
The columns required to enter transaction lines are explained below :
Stock Code
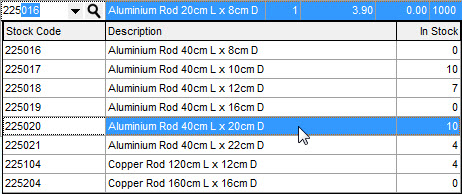
Enter the Code for the stock item or product that you want to include on the transaction line. If you want to perform a search lookup to find the required item you can click the magnifying glass to the right of the column. You can also click the down-arrow button or press Alt+DownArrow on the keyboard to display a drop-down list of all items / products. If you want to enter the full or a partial code you can start to enter the stock code and a drop-down list of all items / products which match the code you enter will be available to select from. The drop-down items list will display the Stock Code, Description, **the quantity In Stock and, if you have Track Sales Order Stock Allocations switched on, the quantity Available.
Once an item is selected it's description will be displayed for you. As mentioned earlier if you want to enter a free-text line you can leave the stock code column blank and press TAB or Enter to enter a description. To view the stock levels for the items as you enter them you can click the Show Stock Info link in the top right of the form. See the Info Panel (explained later in this page) for more information.
Description
This column enables you to enter a description for a free-text line. You can enter a limited amount of text into the column. If you want to enter a longer description you should click the Edit Description button in the toolbar above the entry grid to enter your description into a free-text notepad. If you are entering a stock item or product on the line and want to edit the description for the item or product on this transaction you can edit it in this column or click the Edit Description button to edit the description in the notepad.
Qty
Enter the quantity on this transaction line. This will be multiplied by the price you enter to give you the net value on the line. To view the stock levels for the items as you enter them on the transaction click the Show Stock Info link in the top right of the form (explained later).
Price
Enter the price for the item, product or service. This will multiplied by the Qty column to give you the net value of the line. If entering a stock item or product this will default to the cost price on the item or product.
Minus Prices
If you want to enter a line which is for a deduction on the overall transaction for example to enter an explicit discount or deduction, you simply enter the price you want to deduce as a minus value. The quantity is multiplied by the minus value price you enter to give a line total which is deducted from the overall transaction total.
Disc%
Enter the discount percentage given for this line. If you have assigned a standard discount on the selected supplier's record then this will be used by default.
Account
Enter the reference of the financial account you want to use on this transaction line. This will have a default account entered depending on the supplier, the stock item and whether it is a free-text line. If the selected supplier has as Account defined on their record and their Always use this account setting is checked (see Supplier Details) then this will be used as the default account. If the supplier's record does not have this setting and you have entered a stock item or product on the line then the Sales Account setting on the item's record (see Stock Item Details) is used as the default. If the line is free-text then the Account Reference from the Free-Text Defaults section on the Transactions > Sales/Purchasing page in Company Preferences is used as the default.
To enter a different account for the line you can begin typing the account reference and a drop-down list of matching accounts will be displayed for you to select from. You can also click the down-arrow button or press Alt+DownArrow on the keyboard to display a drop-down list of all accounts. If you need to search for an account you can click the Look-Up button (magnifying glass) to show the search window to find the financial account you require.
Job No.
Enter the Job Number for the transaction line. If you have entered a Job No. in the header section of the form this will be used as the default however you can if you wish specify a differenct job number on each line. Enter the number for the job directly if known or enter a partial number or click the magnifying glass button to do a search lookup for the job and select accordingly.
VC (VAT Code)
Enter the VAT code for the transaction. This is in the range of 0 to 9 with each code representing a rate at which the VAT is calculated based upon the net value of the line. This will have a default VAT Code entered depending on the supplier, the stock item and whether it is a free-text line. If the selected supplier has a VAT Code defined on their record and their Always use this VAT Code setting is checked (see Supplier Details) then this will be used as the default VC. If the supplier's record does not have this setting and you have entered a stock item or product on the line then the Sales VAT Code setting on the item's record (see Stock Item / Product Details) is used as the default. If the line is free-text then the VAT Code from the Free-Text Defaults section on the Transactions > Sales/Purchasing page in Company Preferences is used as the default.
From the details entered above the Net, VAT and Total columns are calculated and displayed. These columns cannot be edited. The Net Total, VAT Total and Total boxes in the bottom right of the form are also updated to give the running transaction totals.
Footer Details
There are several fields available at the bottom of the invoice form beneath the lines entry grid. These details enable you to make additional settings to affect the totals of the transaction.
Carriage
Enter a carriage or a delivery charge for the transaction. This will add the amount you enter to the totals of the transaction. The carriage charge you enter is exclusive of VAT and the VAT will be added to it automatically. The VAT Code and VAT rate used is defined by the Carriage Defaults section on the Transactions > Sales/Purchasing page in Company Preferences. The exception to this is if the supplier has a different VAT code and the Always use this VAT Code setting is checked on their record. To see the VAT Code, the financial account and the carriage totals which will be used you can click the Details button on the bottom left of the form and explained below.
Settlement Disc%
Enter the settlement discount percentage you want to be applied to this transaction. The default value will be taken from the selected supplier's record. This is used if the you intend to pay within a specified number of days (as entered into the Sett. Days box explained below) then you will receive this percentage discount. The actual amount that you will have to pay if you take the settlement discount by paying early is calculated and displayed in the Early Settlement box. As per the guidance laid down by HMRC, the VAT amount is discounted by the settlement discount percentage immediately that the invoice is raised and therefore the total VAT on the transaction is calculated accordingly.
Settlement Days
Enter the number of days that payment must be made in order to take the settlement discount. This is defaulted to the setting on the selected supplier's record. This is primarily for reference purposes only.
Payment Terms
Enter the payment terms in days for this transaction. The default for this is taken from the supplier's record. If no default is specified then the software will automatically assign 30 days as the payment terms. If you are entering a purchase invoice this will be used for the system to inform you when this invoices becomes Almost Due and then Overdue.
Notes
Enter any notes you require for this transaction. The default notes are taken from the Purchase Transaction Notes on the Transactions > Sales/Purchasing page in Company Preferences. These can be included on the document for your supplier's reference.
Trans. Details
This is used to record a brief memo or description about the transaction and will be recorded as the Details for the transaction in your accounting records. The default for this box is taken from the Default Purchase Transaction Details setting on the Transactions > Sales/Purchasing page in Company Preferences. These details are for your own reference and identification within your internal accounting records.
Details
The Details button is used to view the full breakdown of the transaction details and also to change the carriage settings on the transaction.
This shows the total value of goods and services on the transaction (entered through the lines entry grid), the carriage amount and totals and finally the full transaction totals.
In this window you can change the VAT Code and the financial Account used for the carriage charge. These can be changed using the VAT Code and Account boxes under Carriage.
Info Panel
The Info Panel is displayed on the right of the entry window and is based on the links displayed in the top right of the entry form. If you click any of these Show ... links then the Info Panel will be displayed. If none of the Show ... links are selected then the Info Panel will not be hidden. The links you click will determine what information is displayed in the Info Panel. The following screenshot shows the Info bar with all of the Show ... links selected :

When a Show ... link is selected, the caption on the link changes to Hide ... so that you can remove the information from the Info Panel if required.
Supplier Info
The Supplier Info section on the Info Panel is useful for displaying key details about the supplier including telephone number, email address, balance, amount due for payment and the 4 most recent transactions. To show the Supplier Info section click the Show Supplier Info link. You can also carry out tasks within the Supplier Info panel. Any information which is displayed as a blue underlined link can be clicked on. For example click the supplier's email address and you can send an email. Click the link for one of the displayed transactions and you can drill-down to view more details about the transaction. To hide the Supplier Info section click the Hide Supplier Info link
Stock Info
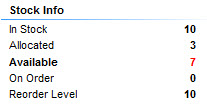
The Stock Info section is used to display the stock level of the currently selected item in the lines grid. This provides you with the quantity you have available In Stock to sell particularly useful if you are using strict stock control. The section also displays the quantity On Order and the Reorder Level. To show this section click the Show Stock Info link. To hide it click the Hide Stock Info link. If you have Sales Order Stock Allocations tracking switched on then the Stock Info panel will also show the Allocated quantity and the Available stock quantity.
When you close the purchase order & invoice entry window, the current settings for the Info Panel will be saved for you. Therefore the next time you open the Purchase Order Entry window all of the opened sections in the Info Panel you selected the last time you used the invoice entry window will be opened automatically for you.
Purchase Order & Invoice Entry Toolbar
The main toolbar for the entry window is displayed at the top of the form and enables you to carry tasks for the entire transaction as explained below :
New
Click the New button to enter a new transaction. If you have made changes to the current transaction in the form you will prompted as to whether you want to save changes first.
Save
Click the Save button to save and record the current transaction, whether new or existing. In the case of Invoices and Credit Notes the transaction will also be written to your accounting records and if necessary to your stock records. Purchase Order transactions will only be written to your stock records to change the On Order quantities on the relevant items. Once saved the transaction will remain on the form you to carry out additional tasks such as printing.
Save & New
Click the Save & New button to save the current transaction entered on the form. Once the transaction is saved the form will be cleared ready for you to enter another transaction.
Save & Close
Click the Save & Close button to save the current transaction entered on the form and then immediately close the window.
Abandon
Click the Abandon button to discard any changes made the current transaction in the form. If entering a new transaction the details will be removed and the details will be emptied for you to start again. If you are editing an existing transaction, this will discard the changes and reload the original transaction onto the form.
Preview (Purchase Order Only)
Click the Preview button to view an on-screen preview of how the printed order will appear. You will be asked to select the document layout that you want first. For more information see the Quick Print section. Please note : The software will automatically save the transaction (or save any changes if editing an existing transaction) before carrying out a preview.
Print (Purchase Order Only)
Click the Print button to send the document of the currently displayed purchase oder to your printer. You will be asked to select the document layout that you want first. For more information see the Quick Print section. Please note : The software will automatically save the transaction (or save any changes if editing an existing transaction) before printing.
Email (Purchase Order Only)
Click the Email button to send the document of the currently displayed order as a PDF attachment to an email message to a specified recipient. You will be asked to select the document layout that you want first. For more information see the Quick Print section. Please note : The software will automatically save the transaction (or save any changes if editing an existing transaction) before emailing.
PDF (Purchase Order Only)
Click the PDF button to export the document of the currently displayed order as a PDF document. You will be asked to select the document layout that you want first. For more information see the Quick Print section. Please note : The software will automatically save the transaction (or save any changes if editing an existing transaction) before exporting.