Recurring Entries
This option is used to define transaction templates which can be used to automate the recording of regularly repeated transactions at specified periods or whenever required. Recurring Entries are ideal to set up regular payments such as direct debits and standing orders. You will then be reminded when they are due to be processed and can be recorded automatically in your accounts. You can also set up templates which are used to auto-complete transaction details to save time during transaction entry.
To access this option select Tasks > Bank > Recurring Entries from the main menu or click the Recurring button in the Bank section.

The Recurring Entries window enables you to set up one transaction template at a time. You enter the basic information about the transaction in the top part of the window. Each recurring entry can be assigned to any number of financial accounts and VAT rates as are required and these, along with their respective values, are entered in the entry grid at bottom part of the window.
To enter a recurring entry complete the details as explained below :
Description
Enter a description for this recurring entry. This is used to identify and to locate the template when required. This can be up to 50 characters. If you want to locate and edit or view an existing recurring entry then you can click the magnifying glass button to lookup and select a recurring entry template.
Type
Select the type of this recurring entry. Click the down-arrow button or press Alt+DownArrow on your keyboard to drop-down the options to select from. You can select from Payment, Receipt or Journal. If you select Payment you can set up a template expense transaction for recording a bank payment however if you then specify a Supplier Ref. (see below) then it is recorded as a Supplier transaction for the specified supplier. The same applies if you select Receipt - this will set up a direct bank receipt unless you specify a Customer Ref then it will be recorded as a Customer transaction for the specified customer. Select Journal if you want to set up a recurring journal entry.
Frequency
Select the frequency that the recurring entry will be recorded. Click the down-arrow button or press Alt+DownArrow on your keyboard to drop-down the options available such as Weekly, Monthly, Yearly etc. If you do not want to automatically record the entry template at regular dates then you should select the None option.
Bank Ref.
Enter the reference of the bank account you want to use to record transactions based on this recurring template. Click the down-arrow button or press Alt+DownArrow on your keyboard to see a list of available bank accounts to select from. If this option was selected from the Bank section then the currently selected bank account will be used as the default, otherwise the default bank account (see Control Accounts in Company Preferences) will be used as the default. Once selected, the bank account's name will be displayed.
Customer/Supplier Ref.
If you have selected either Payment or Receipt as the Type for this recurring entry then you have the option to record it for a specified supplier or customer. Leave this blank if you want to record a direct payment for an expense or a direct receipt for money received into the bank. If you have selected Payment as the Type then you will be asked to specify a supplier. You will be asked to specify a customer if you selected Receipt as the Type. Enter the relevant reference into the field or you can enter a partial reference or click the search lookup (magnifying glass) button to locate the required customer or supplier. Once selected their name will be displayed at the side.
Reference
Enter a brief reference of up to 20 characters that will be recorded for the transaction when this recurring entry is processed.
Details
Enter a description detail of up to 80 characters that will be recorded on the transaction when generated from this recurring entry.
Next Due
Enter the date that this recurring entry is next due to be processed. This date will automatically be changed each time the recurring entry is processed based on the Frequency specified. You can also change this date manually if required.
No. Postings
This box displays the number of times that this recurring entry has been processed. This cannot be changed.
The bottom section of the window is used to enter the financial accounts, the values and VAT information about the transaction.
Lines Toolbar
Above the entry grid is a toolbar which contains key options related specifically to working on entry lines :
Click the Add New Line button to add a new line at the bottom of the existing lines.
Click the Remove Line button to remove the currently selected line.
Click the Insert New Line button to add a new blank line above the currently selected line.
Click the Reverse VAT button to calculate the VAT inclusive of a value entered into the Net column on the selected entry line. This will then place the resulting values in the Net and VAT columns.
Click the Copy Line button to copy the details on the selected line to a new line added at the bottom of the list.
When entering lines for the recurring entry the columns displayed may differ depending on the Type of recurring entry you have selected. For example if you have selected a Payment or Receipt entry you will see Net, VAT and Total columns. If you have selected a Journal type then you will see Debit and Credit columns instead.
Complete the entry grid columns as explained below :
Account Ref.
Enter the reference of the financial account you want to use on this line of the entry. You can begin typing the account reference and a drop-down list of matching accounts will be displayed for you to select from. You can also click the down-arrow button or press Alt+DownArrow on the keyboard to display a drop-down list of all accounts. If you need to search for an account you can click the Look-Up button (magnifying glass) to show the search window to find the financial account you require. Once an account is selected the account name will be displayed in the Account Name column.
Details
Enter a note or description related specifically to the line for the specified account. This will default to the main transaction details entered. This is useful if there is some additional information you want to record about the specific line within the transaction that will appear in transaction reports and lookups for the account specified. This can be up to 80 characters.
Net
(Payments & Receipts Only)
Enter the net value of the transaction. If you want to use the VAT reverse function then you can enter the total value in here and click the Reverse VAT button to calculate the net and VAT values automatically.
VC
Enter the VAT code for the transaction. This is in the range of 0 to 9 with each code representing a rate at which the VAT is calculated based upon the net value entered. The default for this field is the standard rate for Payments and Receipts and the non-VAT rate is the default for Journals.
VAT
(Payments & Receipts Only)
Enter the VAT (sales tax) value on the transaction if different than the VAT value calculated for you.
Debit
(Journals Only)
Enter the Debit value for the journal line if required. Generally a transaction which debits an account is related to the increase in the value of an asset or the decrease in the value of a liability. For example if you are recording a journal for money coming in to a bank account then you would enter a value in the Debit column. For Profit & Loss accounts a Debit value represents an increase in an expense or a decrease in income.
Credit
(Journals Only)
Enter the Credit value for the journal if required. Generally a transaction which credits an account is related to the decrease in the value of an asset or the increase in the value of a liability. For example if you are recording a journal for money going out of a bank account then you would enter a value in the Credit column. For Profit & Loss accounts a Credit value represents an increase in income or a decrease in an expense.
Toolbar
The options on the Toolbar at the top of the window are used to carry out tasks related to the entire recurring entry you are working on :
Click the New button to enter a new recurring entry template.
Click the Save button to save the details entered or changed for the recurring entry. Once saved you can continue editing the recurring entry.
Click the Save & New button to save the recurring entry and to clear the fields to enable you to enter a new recurring entry.
Click the Save & Close button to save the recurring entry you have entered and close the window immediately after completion.
Click the Abandon button to discard any changes you have entered and restore the original details
Click the Delete button to completely remove the recurring entry record. Please note : Deleting the recurring entry has no effect on transactions already recorded from the recurring entry template.
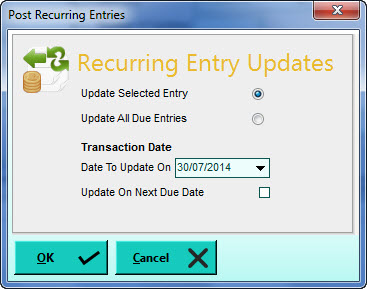
Click the Updates button if you want to process transactions from the currently selected entry or from all due recurring entries. This will display a window which will enable you to make certain selections and settings about which recurring templates you want to process. This option is particularly useful for processing recurring entries which are not given a specific frequency in order to process them whenever you require. Click OK in the Recurring Entry Updates window when you have made your selections and want to process them.
Click the left green arrow button to move to the previous recurring entry and click the right arrow button to move to the next entry record.