Customer Details
The Customer Details option is used to add new customer records and to edit, view or delete existing customer records. In addition you can create records that are sales contacts but not full customers.
This option is available from the main menu by selecting Records > Customers. You can also access it from the Customer section by clicking the New and Edit buttons.

The toolbar at the top of the Customer Details window is used operate the form and to carry out key tasks :
Click the New button when you want to add a new customer record.
Click the Save button when you want to save the details you have entered for a new or existing customer record.
Click the Save & New button when you want to save the details you have entered and immediately add a new customer record after saving.
Click the Save & Close button when you want to save the details you have entered and close the Customer Details window immediately after saving.
Click the Abandon button to discard any changes you have entered to a customer record and restore the original details.
Only one of the next three buttons explained (Delete, Inactive, Activate) is available to select depending on the status of the customer record.
The Delete button is only available if the customer record has no transaction activity recorded. This will permanently delete the customer record that is displayed.
The Inactive button is available if the customer record has transactions recorded for it and it presently active. Clicking this button will set the customer record inactive and remove it from view. It will not be included in lists, searches or reports however it's transactions remain and it can be re-activated at any time.
The Activate button is available if the customer record has transactions recorded for it and has previously been set to Inactive. Click this button to restore the customer so it is included in lists, searches and reports again.
For more information on setting customer records active and inactive see the Set Records Inactive & Active topic.
Click the Copy button to make a copy of the customer record that is displayed. This will copy all of the details for you to make changes for a new customer record. You must then specify a unique reference for the new customer.
Click the Email button to send an email through the software to the customer. This will bring up the email window to enter your message. See the Sending Emails page for more information.
Click the History button to view the transaction activity of the selected customer. See the Transaction History section for more information.
Click the Statement button to print or email a statement for the selected customer. See Statements for more information.
Click the left green arrow button to move to the previous customer's record (in Reference order) and click the right arrow button to move the next customer's record.
Adding A New Customer
Every new customer that you create must have it's own unique reference. This reference will then be used throughout the system to find and retrieve the customer record. It is standard practice to use an abbreviated or shortened version of the customer name which will make customer records easier to locate.
When adding a new customer you will first be asked to enter a unique customer reference. If you leave the Customer Ref. box empty, a reference will automatically be created for you based upon the name you enter for the customer. For example if you leave the reference box empty and enter ABC Building Supplies in the Customer Name box, the software will automatically assign ABCBUILDIN as the customer reference.
Adding non-customer records
If you want to add a new sales contact who is not a full customer and you don't want to include them in the main Customer list you can specify them as a different type. To do this you will notice a drop-down box on the right of the Customer Ref box. By default this will be set to Customer (unless you selected to add a new record from the Customer section with a different list type selected). Use the drop-down to select to a different type that you want this record to be eg Sales Lead, Web Lead, Exhibition Contact etc. If the type you want the record to be is not included yet in the drop-down list, simply enter the name of the new type directly into the box. All non-Customer type records are treated identically and you will notice that when you select a different type other than Customer, the options and tabs on the right will change accordingly to exclude information related only to full customer records. You can then enter sales transactions for the non-customer type record such as quotations and proformas and convert them when you need to. If you raise an invoice for the record or convert a quotation, estimate, proforma etc into a sales order or an invoice, the record will automatically be converted to be a Customer type.

Finding A Customer
To find another customer record that you want to view or edit you must first ensure that the magnifying glass and edit icons in the right-hand side of the Customer Ref. box are displayed. If they are not you will need to save changes to the record you are editing or adding first. You can then enter the reference for the customer you are looking for into the Customer Ref. box, whether you enter the full or a partial reference. If you enter a partial reference or click the Look-Up icon (magnifying glass) you will be given a list of customers to help you find you one you want to view or edit.
Changing A Customer's Reference
On occasion you may want to change a customer's reference eg to make them easier to find etc. You can do this by finding the customer you want and clicking the edit/pencil icon on the right in the Customer Ref. box. This will display a window to enable you to enter the new reference for the customer. When you have entered the new reference click OK. You will need to click one of the Save buttons in the Customer Details window for the change of reference to be recorded.
Adding & Viewing Attachments For A Customer
If you wish to add file attachments or web links to a customer record you can do so in this window by clicking the paperclip icon on the far right of the Customer Ref. box. This will open the Attachments window displaying any existing attachments previously added for the customer. You can then add, view, open and remove attachments. See Attachments for more information.
Address
The address box for the customer is a free-text notepad however you should be aware that the software will only maintain 4 separate address lines of 80 characters per line and an additional postcode line of up to 10 characters. Any additional information you enter beyond these limits will either be truncated or removed. You can have an unlimited number of
addresses to each customer using the Addresses tab explained later.
Contact Info
The contact information displayed relates to the main contact you assign to a customer. You can however maintain as many different contacts for each customer as you need. You can add a new contact by clicking the + symbol to the right of the Contact Name box. You can also edit the full details of the displayed contact record by clicking the pencil icon to the right of the Contact Name box (as well as editing their details using the field provided). To view a list of all contacts for a particular customer you can use the Contacts tab explained later.
If you have more than one contact for a particular customer and you want to select to view and/or edit their details on the main page you will be given a drop-down button in the right of the Contact Name box. Click the drop-down button for a list of all of the customer's contacts and select the one you want. Please note that selecting a different contact from the drop-down will not automatically assign that record as the customer's main contact. To do that you must use the facilities on the Contacts tab (explained later).
One of the key elements of maintaining multiple contacts is the ability to choose which contacts and which email addresses you send invoices and statements to. To define this you must edit the contact's full details by clicking the pencil icon next to the Contact Name box or by using the facilities explained in the Contacts tab.
A contact can maintain 2 email addresses and 2 telephone numbers. By default however only one box is displayed for each and you will need to press the + symbol to the right of the Telephone No. and/or Email boxes to display another box to add a second telephone number and/or email address.
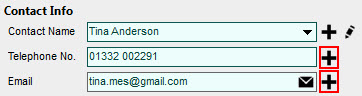
When you enter a second telephone number and/or email address and you later view their information, the second box will automatically be displayed.

The Email, Web Site, Twitter and Facebook boxes all have a button in the right of their respective boxes. Click these to lookup the address contained in the relevant box.
On the right-hand side of the Customer Details window are several tabs used to enter or to view details for the selected customer.
Details
The Details tab is the default and enables you to make settings about the customer which will determine how the customer and their transactions are processed.
Credit Limit
Enter the credit limit amount for the customer in order to keep a check on the customer's outstanding debt to you.
Payment Terms
Enter the standard payment terms for the selected customer. This will determine when the customer's outstanding invoices become due for payment. To change the payment terms period specific to this customer ie from Days to Months or to change from when payment terms commence ie from Invoice Date or from End Of Month you can click the magnifying glass to the right of the Payment Terms box and you will be able to define these settings for the customer. By default all payment terms settings for customers are the company-wide payment terms set in Company Preferences unless specifically changed here. Please note that the payment terms defined here are used on all invoices created for the customer however each transaction have their own specific terms if required.
Sett Disc %
Enter the early settlement discount percentage that the customer is allowed to take if invoices are paid within a specific number of days of the invoice being raised. Leave as zero if you will not use this facility.
Sett Days
Enter the number of days from the invoice being raised that the customer can take the early settlement discount as entered in the Sett Disc % box. Leave as zero if you don't require to use this facility
Discount %
Enter the standard discount percentage that this customer is given. This will automatically be used when entering invoices* for this customer.
Price Level
Select the price level that this customer is assigned. In the Stock section each item can be assigned up to 3 price levels. This box enables you to select which of these price levels this customer is assigned. The setting made here will determine the price that is automatically used on invoices for this customer. Click the drop-down arrow for a list of price levels.
Discount Level
Similar to the Price Level field, the Stock section enables you to assign up to 3 discount percentage levels, A, B and C to each item. This box enables you to select which of these discount levels this customer is assigned. If set here, the discount level selected will determine the discount that is automatically used for each item when added to an invoice for this customer. Click the drop-down arrow or press Alt+DownArrow on your keyboard for a list of discount levels available or select the blank option to make no setting. Please Note: The static discount percentage entered into the Discount % box will always take priority over this setting. Therefore if you want to use this setting you should leave the Discount % box as zero.
Use Last Price
Tick this box if you want to always use the last price that the customer paid for items at the point of invoicing. If this setting is ticked, when entering an invoice for a customer in future, the software will look for the last time the item was purchased by the customer and use that price on the next invoice. **If an item has not been previously purchased by the customer the price used will be based on the Price Level setting above. ***This setting is overridden if a unique price is entered for a stock item for this customer (see details about the Prices tab below for more information).
Use Last Discount
Tick this box if you want to always use the last discount that the customer was given for items at the point of invoicing. If this setting is ticked, when entering an invoice for a customer in future, the software will look for the last time the item was purchased by the customer and use that discount on the next invoice. **If an item has not been previously purchased by the customer the discount used will be based on the Discount Level setting above. ***This setting is overridden if a unique discount is entered for a stock item for this customer (see details about the Prices tab below for more information).
Carriage
If you have a standard carriage charge that applies to the customer then you can enter it in here. Any sales transactions you enter for the customer will use this carriage charge by default although it can be change on individual transactions if required. This setting overrides any other carriage setting eg Carriage Defaults in Company Preferences. If you leave the value as zero the software will automatically use the default carriage charge defined in Company Preferences.
Account
Select the financial account that will be used as the default when transactions are being entered for this customer. Assigning an account to a customer record is useful if you want transactions for this customer to be recorded in a specific financial account. Use the Look-Up icon (magnifying glass) to search for the relevant account if required. If this facility is not required for this customer simply leave this box blank.
Always Use This Account
Used in conjunction with the Account box (above), this is a checkbox to set if you want the financial account specified in the Account box to always be used for transactions for this customer. If you leave this box unticked then for some types of transactions the software will override the account setting on the customer record with other considerations such as financial accounts specified on stock items etc. However if you tick this box then the financial account specified in the Account box will always be used on transactions for this customer regardless of other settings made elsewhere in the software.
On Stop
This checkbox is used to specify if you want to place this customer On Stop. The software will either warn you or prevent you (depending on settings in Company Preferences) when attempting to raise a new invoice or sales order for any customer who placed On Stop.
VAT Registration No.
Enter the VAT Registration Number for this customer. This is particularly important if the customer operates from another EC member state to ensure their VAT reference is included in the EC Sales List report.
VAT Code
Select the standard VAT Code that is to be used on transactions for this customer. For domestic customers you can generally leave it as the Standard rate VAT Code, 1, however for customers from other EC member states you will need to select the appropriate EC Sales VAT rate (the default is 5).
Always Use This VAT Code For This Customer
This checkbox is used to specify that you want the selected VAT Code to always be used for transactions for this customer. If you leave this box unticked then for some types of transactions the software will override the VAT Code from the customer record with other considerations such as settings on stock items etc. However if you tick this box then the VAT Code specified on the customer record will always be used on transactions for this customer regardless of settings made elsewhere in the software. This is especially useful for customers from other EC member states where their EC Sales VAT rate should always be used for their transactions.
EC Country
Select the EC Country that the customer operates from using the drop-down button to view a complete list.
Assign A Group
This enables you to assign the customer to a particular group. Utilising groups makes reporting, producing statements and other tasks quicker and easier. Customer groups require no set-up and are designed to be as simple and straightforward as possible. You don't need to set-up a group beforehand, you can click the drop-down button for a list of existing groups or to create a new group you simply type the new group's name into the box. If you don't want to assign the customer to a group you can select the blank option at the top of the drop-down list.
Please note : Customer groups only exist by virtue of their being assigned to one or more customers. Therefore if all customer are unassigned from a group it ceases to be available.
Sales Order Priority Settings
The Sales Order Processing facilities enable you to allocate available stock to sales orders in a batch. When you perform an Allocation Run, the software runs through a list of selected sales orders from start to finish allocating the available stock until there is no more stock available. You can order the list of sales orders by customer priority order before an Allocation Run which will ensure that as the orders are allocated, the highest priority customers get the available stock first. These settings enable you to define the order processing priority level for each customer.
Assign a Priority Level
Tick the checkbox if you want the customer to have a priority level assigned. If you leave this unticked the customer will not have a priority and will be allocated stock on a first-come-first-served basis after those sales orders for customers with an assigned priority level.
Priority Level
Use this drop-down box to select the priority level that you want to assign to the customer. This can be Priority Level 1 - 10 with 1 being the highest priority level eg will have their orders allocated first.
Balance
The Balance tab is used to view the current and aged balances for the customer. The Unallocated box shows you any payments or credit notes for the customer which have not been allocated to invoices. It also enables you to see the customer's turnover for the current month and year, last invoice and payment dates, the total amount that the customer has paid you, the amount now due for payment and the amount that the customer has placed on query. You can also see the Average Payment Days, showing you the number of days on average that it takes the customer to pay you based upon their payment history.
Addresses
The Addresses tab is used to maintain additional addresses that you want to use for this customer.

This tab provides a list of all of the addresses stored for this customer. The left-most column in the list displays an icon to represent the status of an address. An address with a star icon indicates that the address is the main address for the customer. An address with a van icon indicates that it is the main delivery address for the customer. If a customer has an address assigned as the main delivery address, that address will automatically be used as the default delivery address for all invoices* raised for the customer. An address with no icon indicates that it is a standard address and is available to be selected as a delivery address during invoice entry for the customer.
To set the status of an address in the list, right-click in the list and select from any of the Mark as Main Address, Mark as Main Delivery Address or Mark as Standard Address options provided on the pop-up menu.
To add a new address for the customer click the New Address button above the address list. See the Adding & Editing Addresses page for more info.
To edit an existing address in the list, highlight it in the list to select it and click the Edit Address button.
To delete an address from the customer record, highlight it in the list to select it and click the Delete Address button. You will not be able to delete the customer's main address using this option.
Please Note : None of the changes you make in the Addresses tab, whether adding a new address or editing or deleting an existing address, will be saved until you click one of the Save buttons.
Contacts
The Contacts tab is used to list multiple contacts that you maintain for this customer.
To add a new contact for the customer click the New Contact button above the address list. See the Adding & Editing Contacts page for more info.
To edit an existing contact in the list, highlight it in the list to select it and click the Edit Contact button or double-click the contact in the list.
To delete an contact from the customer record, highlight it in the list to select it and click the Delete Contact button. You will not be able to delete the customer's main contact record using this option.
Please Note : None of the changes you make in the Contacts tab, whether adding a new contact or editing or deleting an existing contact, will be saved until you click one of the main Save buttons.
The left-most column in the list of contacts displays a star next to the contact record which is the main contact for the customer. If you want to change which contact is the main contact for the customer, you can right-click on the relevant contact record and select the Mark as Main Contact from the pop-up menu.
Email Settings For Contacts
Each contact can be setup to automatically receive documents such as Invoices and Statements to their email address(es) when you email them to the customer. To define if a particular contact will receive invoices or statements for the customer, you can right-click on the relevant contact and select Email Invoices To This Contact or the Email Statements To This Contact. Once selected, the next time you right-click the contact record, the relevant setting on the pop-up menu will have a tick next to it indicating that this contact will receive the relevant type of document when emailed for the customer.

If a contact has more than one email address and you want to specifically set which email address you want to send documents to, you will need to edit the full contact's details by clicking the Edit Contact button. See the Adding & Editing Contacts for more information.
Notes
The Notes tab is used to enter General Notes about the customer that you want to maintain into their own notepad. *You also have a second tab page for Transaction Notes which enables you to define the notes that you want to use on different types of transactions for the customer. While you can setup the notes that you want to use on invoices and other documents for all customers (see Company Preferences for more information) this enables you to define notes to use on documents specifically for this customer. If any of these transaction notes are left empty then the software will automatically use the notes defined for the company.

Each tab in Transaction Notes enables you to enter notes for different types of transactions including Credit Notes, Quotations**, Estimates**, Proformas** and Sales Orders***.
Documents
The Documents tab is split into 2 tab pages. The first is for Layouts which is used to define the document layouts to use when printing or emailing documents specifically for this customer. The second page is for Email Templates to enable you to select which email message templates to use when emailing documents for this customer.
Layouts
If you have a specific document layout that you want to use for invoices* or for statements for this customer, you can select them here. When printing or emailing documents for this customer, the layouts specified will automatically be used as the default so you do not have to remember to select a layout each time. If you do not have specific layouts for the customer simply leave the settings blank.

Please Note : It is important to remember that this setting is not used as a way to automatically utilise the specified layout when producing documents for the customer. It is used solely to determine the default document layout setting at the point of producing documents. Therefore this setting only applies when producing one or more documents specifically for this customer. In cases where you are printing or emailing batches of documents involving other customers this setting will not be used.
Email Templates
When emailing documents such as invoices* and statements to customers, the message that the document is attached to is based on pre-defined email templates. While you can define email templates for sending to all customers (see Company Preferences for more information), if you need to use a specific message to send to this customer when emailing different types of documents you can use the settings here.

If you don't have templates that you specifically want to use for this customer then leave the relevant templates boxes blank and the templates defined in Company Preferences will automatically be used instead.
Email message templates are stored in text files with the extension .etp. You can specify a template file for use with each of the different type of documents using the boxes provided.
Please Note : Email templates files (.etp) are stored by default in the \Email\Templates sub-folder in the main Avanti folder on your PC (or on your Server PC if using the multi-user edition). Where a file is stored in this default folder you will see just the file name and not the full location of the file. If you choose to create or save a template file in another location then the full path of the file will be displayed and stored.
You will see three buttons to the right of each of the template boxes as explained below :
The first button is used to browse to find an alternative message template file which has been created previously.
The second button is used to create a completely new message template file.
The third button is used to edit the message template file which is specified in the box.
If you choose to edit the existing message template or to create a new one, you can use the Email Template window which gives you the tools to set up a message template to include the precise details you want to send along with your documents.
Click here for details on how to set up Email Templates.
Prices
The Prices tab is used to enable you to assign unique stock prices and/or discounts for this customer. This is useful if you have arranged for specific customers to have unique pricing and/or discounts for specific items. At the point of entering invoices and other transaction types, the software will determine if an item being entered has a unique price for the customer and will automatically utilise it, superseding all other price settings which may have been defined.
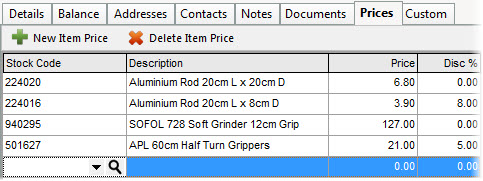
To add a new item price for the customer click the New Item Price button and the Stock Code column will be highlighted on a new line for you to specify the relevant stock item. Click the down-arrow button or the magnifying class button for assistance in finding the correct item. Once selected, the item's description will be displayed as well as the price and discount currently relevant to the customer based on other price and discount level settings. You can then edit the Price and/or the Disc% columns to set-up unique pricing for the customer for the selected item.
To delete an item from the Prices list click the Delete Item Price button.
Please Note : None of the changes you make in the Prices tab, whether adding a new item price, editing or deleting an existing, will be saved until you click one of the main Save buttons.
Activity
Activities enable you to record interactions with your customers and sales contacts to keep a full track of telephone calls, emails, letters, appointments etc.
Activities can be accessed using the Activity tab in the Customer Details window. Click the Add button to add a new activity and display the Activity window.
To edit an existing activity in the list, highlight it in the list to select it and click the Edit Activity button or double-click the activity in the list.
To delete an activity on the customer record, highlight it in the list to select it and click the Delete Activity button.
Please Note : None of the changes you make in the Activity tab will be saved until you click one of the main Save buttons.
Custom
The Custom tab is used to enter information into one of the 5 available custom fields for the customer. Custom fields are used where you want to enter additional information about the customer for which there are no standard fields available.

Each field can store up to 100 characters. You can name each of the fields anything you want to make the information you enter easily identifiable. You do this by changing the field labels simply by clicking on any of the field's captions to the left of each custom field box.

Enter your new field label and click OK.

Please note : The changes you make to custom field labels apply to all customers and not just the one you are editing.
In addition to entering and viewing custom field information in the Customer Details window you can also use the software's Search facility to find a customer by any information entered in the custom fields. You can also add any of the custom fields to the Customer section list by clicking the button in the top-left of the list in the Customer section and selecting the fields that you want to view, as shown below :
