Order Processing
The Process Orders option is the hub of the Sales Order Processing facilities in Avanti. It enables you to utilise all of the order processing workflow required to work with your sales orders. From allocating stock to sales order, picking and dispatching through to invoicing.
You can access the Order Processing window by selecting Tasks > Sales > Process Sales Orders from the main menu or by clicking the Process Orders button from the sales section.
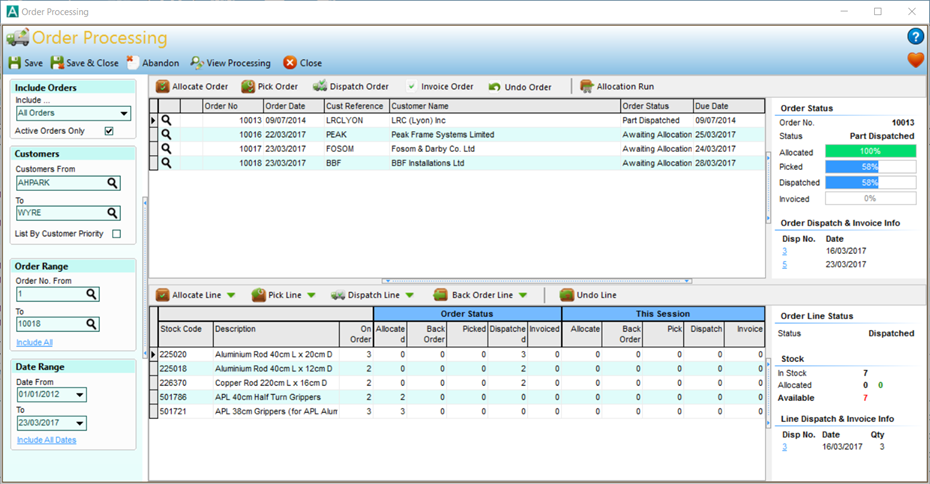
The Order Processing window enables you to define a list of orders you want to work with. Once the list of orders is selected you can process several orders in a session before you need to save the changes.
You define the list of orders you want to work with using the panel on the left of the window. This lets you choose the orders you want to process based on a particular status, a range of customers, a date range and an order number range. If you change the list that is displayed by changing any of the settings on the left, you must first save or discard the processing changes you have made to the list you have been working on.
When you select a range of orders to work on, the sales orders within that criteria are displayed in the list in the top half of the window. When you click on a sales order in that list or move to a different sales order in the list, the lines on that particular sales order are displayed in the list in the bottom half of the window. The toolbar of options displayed immediately above the sales order list at the top relate to tasks you can perform on an entire order. The toolbar displayed above the order lines list at the bottom contains options specifically for dealing with the selected order line.
On the right of the sales order list you will see a status panel which displays further information about the currently selected sales order including the status of the overall order. A similar status panel is displayed to the right of the order lines list at the bottom displaying information specifically related to the selected order line. We'll cover this in more detail later.
Defining The Sales Order List
Include Orders
Include ...
This drop-down box is used to select the range of sales order you want to work on based on the status of orders. For example if you want to allocate stock to sales orders you can select the Orders Awaiting Allocation or if you want to see all Back Orders or Cancelled Orders etc. This is used in conjunction with the Active Orders Only checkbox displayed immediately below which defines if inactive/completed sales orders are included in the list (see below).
The options available in the Include Orders list are explained below :
All Orders
Include all sales orders regardless of status, utilising the other settings in the range panel in particular the Active Orders Only setting.
Orders Awaiting Allocation
Selecting this option will include all sales orders that haven't been allocated any stock yet. This will include any sales order that has at least one line that hasn't been allocated or has only been partially allocated. This is useful when you want to carry out the allocation step of the order processing workflow. If you want to allocate sales orders in a batch automatically, you can select this option and use the Allocation Run button (in the sales order list toolbar) to run through outstanding orders and automatically allocate available* stock to sales orders.
Orders Awaiting Picking
Select this option if you want to list orders that are awaiting picking. The Picking processing step is entirely optional and is ideal for users who need a workflow step between allocating stock and dispatching. All orders within the selected criteria that have lines which haven't been dispatched or previously picked will be included in the list. See the Picking List report to produce a list of order items to be picked.
Orders Awaiting Dispatch
Select this option if you want to list orders that are awaiting to be dispatched. This will include any sales order that has at least one line which has a quantity that's been allocated but hasn't been dispatched. This is useful when you want to process dispatches in a batch. The dispatch step will reduce stock levels and generate a Delivery Note record which can be printed and/or emailed for customers.
Orders Awaiting Invoicing
Select this option if you want to include orders that have been dispatched but not yet invoiced. This will include any sales order that has at least one line with a quantity that's been dispatched but not yet invoiced. This is useful to see all sales orders that simply require invoicing as the final workflow step.
Due Orders
Select this option if you want to list any active sales orders which have reached or exceeded their given due date. Order due dates can be specified when entering or editing a sales order through the order entry window. The orders included with this option are dependent on the Active Orders Only setting being ticked.
Back Orders
Select this option if you want to include sales orders that have any item lines which have a quantity placed on Back Order.
Unfulfilled Orders
Select this option to include orders which are defined as Unfulfilled. Unfulfilled orders are those sales orders which have exceeded their due date and have one or more item lines with a quantity that hasn't been fully allocated or placed on back order.
Allocated Orders
Select this option to include sales orders which have item lines with a quantity that has already been allocated.
Picked Orders
Select this option to include sales orders which have item lines which have already been picked.
Dispatched Orders
Select this option to include orders which have any item lines that have previously been fully or part dispatched.
Invoiced Orders
Select this option to include sales orders which have previously been invoiced.
Cancelled Orders
Select this option to include orders which have been cancelled or has item lines that have been cancelled.
Active Orders Only
The Active Orders Only checkbox is used in combination with the option selected in the Include .... box explained above. With this box ticked, the software will only include sales orders in the list that have not yet been fully completed eg not fully invoiced and not cancelled. If this box is not ticked then all sales orders within the other criteria specified, regardless of whether they are active or completed, will be included in the list. This is not relevant for some options such as any of the Orders Awaiting ... options because any orders awaiting allocation, picking, dispatching or invoicing are, by definition, active and will be included in the orders list regardless of this setting.
Customers
These settings enable you to define a range of customer(s) whose orders you want to include in the orders list.
Customers From
Select a customer that you want to begin including sales orders for in the list. This will default to the very first customer. You can enter a partial or a full customer reference to find the customer you want or click the magnifying glass to show the Search lookup window to help you find the customer you want. When you select a different customer to the default, the software will assume you want to list sales orders just for that customer and will change the To box (see below) to the same customer.
To
Select the customer that you want finish listing sales orders for. This will default to the very last customer. You can enter a partial or a full customer reference to find the customer you want or click the magnifying glass to help you find the customer you want.
List By Customer Priority
This checkbox is used to specify if you want to order the list of sales orders by the priority level of customers. This enables you to view and process orders based on the highest priority customers first. This option becomes particularly useful when using the Allocation Run option in the orders toolbar. The Allocation Run button will begin an operation to allocate stock to sales orders from the top of the orders list to the bottom, particularly useful when you are limiting allocations to available stock only*. With this box ticked and the sales orders listed by customer priority, your high priority customers are guaranteed to be allocated the available stock first. See Customer Details for information on defining sales order priority settings for customers. Please note : This is only setting within defining the sales order processing list which does not retrieve data into the list. Instead it sorts the data already loaded into the sales order list and therefore changing this setting will not require saving previous changes first.
Order Range
These settings enable you to define a range of order numbers that you want to include in the sales orders list
Order No. From
Enter the sales order number that you want the list of orders to start at. Click the magnifying glass to the right of the box to help you find the order you require. Any orders numbered before this number will not be included in the orders list.
To
Enter the sales order number that you want the orders list to finish at. Any orders numbered after this will not be included. Click the magnifying glass if you require help to locate the required order number.
Include All
Click this link if you want to disregard the above order number range settings and to include all orders (within the other specified criteria). When you click this link it will change to say "Set Order Number Range" and you click it again to include the order number settings in the sales order list criteria again.
Date Range
These settings are used to specify a range of dates to include sales orders for.
Date From
Enter or select a date that you want sales orders to start at. Any sales orders dated before this will not be included in the list. Click the arrow in the right of the box to drop-down a calendar to select a date from.
To
Enter or select a date that you want to end the sales order list at. Any sales orders dated after this will not be included in the list. Click the arrow in the right of the box to select a date from a calendar.
Include All Dates
Click this link to disregard the date range settings above and include sales orders regardless of their dates (taking into account the other specified criteria). After clicking the link it will change caption to say "Use Date Range" and if clicked again will include the date range settings again in defining the list of sales orders.
Processing Orders
It's important to note that nothing you do when processing orders is permanent until you click one of the Save options on the main toolbar (or select to Save when asked). You can process as many orders in the list as required before you save. This is what we refer to as This Session, that being the processing carried out since you last saved (or opened the order processing window) and prior to saving the current changes. As you process orders in this session the status displayed for both full orders and order lines are based on what they will be once you save the session. You will be able to tell which orders have any processing performed for them in this session as they will show a tick (to the right of the magnifying glass) in the sales orders list.
If you look at the order lines list in the bottom half of the window you will see columns displaying the Stock Code, the Description and the On Order quantity. To the right of these columns are a series of quantities split into two bands. Each band has a quantity for Allocated, Back Order, Picked, Dispatched and Invoiced. The first band is Order Status. This displays the quantities that have previously been processed on each order line AS WELL AS the quantities processed in this session. For example if a quantity of 2 was previously allocated to the order line and you have now allocated an additional quantity of 1 in this session, the Allocated quantity in the Order Status band will be 3. The second band is This Session and represents the quantities on each order line that have been processed in this session but not yet saved. Therefore using the above example, the Allocate column in This Session band will show 1. The quantities displayed in This Session band are very important as they tell you what is going to be processed on the order line when you save the session. The Order Status band tells you what the order line quantities will be after the session is saved.
To give an additional example, let's say you have an order line where 2 have previously been allocated. Initially Allocated in Order Status will be 2 and Allocate in This Session will be 0. You decide to unallocate the quantity from the order line. Remember that the Allocate column in This Session displays the quantity that will be processed upon saving and the Allocated quantity in Order Status shows the combination of both the current saved quantity on the order and the quantity in this session (to show you what it will be once saved). In this case we're reducing the Allocated quantity by 2 (from 2 to zero) so the Allocate quantity in This Session will become -2 (minus 2) and when this is reflected in the Order Status, the Allocated quantity will be 0 as we wanted.
To recap :
The quantities in Order Status shows the current saved quantities and the unsaved quantities processed in this session. It shows you what the quantities will be once saved.
The quantities in This Session shows the processing you have carried out during this session that are not yet saved. It shows you the quantities that will be processed specifically for this session when saved.
Processing Complete Sales Orders
This sections explains how to process complete orders using the options in the toolbar displayed above the sales order list in the top half of the window. These options are used to process a full order including all of the item lines on each order. If you need to carry out specific processing on a particular item line you should use the options on the toolbar above the item lines list instead (as will be explained shortly).
Allocate Order
Click the Allocate Order button to attempt to allocate all outstanding quantities for the selected sales order in the orders list. How this is processed will be decided by the Sales Order settings (defined in Company Preferences) and by the stock that is available. For example if you have set the software to "allocate available stock only" then only available stock will be allocated to the order lines otherwise it will allocate regardless. If the order has any lines allocated or part allocated in this session, it will have the quantities displayed and updated in the This Session band in the order lines list. On the status panels on the right the order status and progress bars will be updated accordingly. A tick will also be displayed next to the sales order in the orders list. If you want to allocate more than one order by carrying out an Allocation Run see the section on the Allocation Run below. I
Pick Order
Click the Pick Order button to attempt to increase the Picked quantities on the selected sales order. Picking is an optional and non-processing step in the order processing workflow however provides a useful intermediate step between stock allocation and dispatching. The quantity which the software picks is based around the allocated quantity and it will not pick a quantity higher than the quantity that has been allocated. As with allocating the order, whenever picking involves updating a quantity the order is marked with a tick and the quantities are adjusted accordingly in the order lines list. The Order Status panel is also updated (for more information on how order statuses are changed see the topic on Order Processing).
Dispatch Order
Click the Dispatch Order button to attempt to increase the Dispatch quantities on the selected sales order. Dispatching is a key processing step in the SOP workflow. The quantity it will automatically attempt to dispatch is the Allocated quantity however where this is zero it will attempt to first Allocate and then Dispatch that quantity (taking into account previously dispatched quantities prior to this session). Please note : Whether a quantity can be dispatched is not based on available stock (as is the case when Allocating) but on actual stock and utilises the "Allow In-Stock Levels To Be Exceeded" setting in Company Preferences to determine how it is dealt with. If stock is not allowed to be exceeded (eg a strict stock control system) and there is not enough stock to be dispatched (regardless of whether stock has been allocated to the order or not) then the software will not allow a dispatch of more than the quantity physically in stock. See the section below on Processing Dispatches for information on how dispatches are processed when you eventually save.
Invoice Order
Click the Invoice Order button to invoice any outstanding lines and quantities on the order. Invoicing an order is the final step in the order processing workflow. When you select to Invoice an order it will invoice quantities that are already dispatched. Where quantities are available to be dispatched but haven't been processed to be dispatched, their quantities will be set to dispatch first and then these quantities also used to Invoice. It is however important to note that neither sales orders nor individual quantities are actually invoiced - only dispatches (delivery notes) are invoiced. Therefore any outstanding delivery note records generated during previous sessions and those created within this session will be used to generate the invoice rather than the sales order itself. See the section below on Processing Invoices for information on how invoices are generated when you save.
Undo Order
If you want to undo all of the processing steps performed on the selected sales order in this session you can click this button and all the quantities on each order line in This Session will be reset and the processed tick removed from the sales order. This is useful if you want to begin again with the processing the order. It is important to note that this only undoes changes made in This Session and does not undo changes which were previously made to the order and saved.
Allocation Run
Use the Allocation Run option to attempt to allocate all sales orders in the orders list beginning at the first order as it is listed. If you are only allocating stock to sales orders based on available stock (see Company Preferences) the stock will be allocated to each order as it processes it and subsequently the quantities available to orders further down the list will become less and possibly be exhausted. To ensure your best customers get the stock they ordered before others you can assign a higher priority level to them (see Customer Details) and then list the sales orders list in customer priority order (by ticking the List By Customer Priority checkbox as explained earlier). This puts your highest priority customer's orders at the top of the list and ensures that they get the available stock first during the Allocation Run. If you have selected not to allocate stock to orders based on available stock then all orders will be allocated to stock that was ordered regardless of availability.
Processing Sales Orders Lines
This section explains how to process sales order lines. This enables you process and make changes to individual lines on an order rather than the whole order. The options for processing individual sales order lines are displayed in the toolbar above the sales order lines list.
Allocate Line
The Allocate Line button provides several options to automatically allocate stock to the selected order line. Click the main button to have the software attempt to allocate the line. If you have set the software up to only allocate available stock then this will attempt to allocate stock that is available eg not already allocated to other orders. If you have not set the software up to allocate available stock only then all of the outstanding quantity on the order line will be allocated.
In addition to the main option of allocating the order line, you have a green arrow on the right of the button. If you click this rather than the main part of the button you will see a drop-down. On this menu you can select to Allocate the order line (which performs the same task as clicking the main button as explained above). You also have the option to Unallocate the line. This is useful if you have previously allocated stock to the line which is saved on the order and you want to remove the allocation. Please note : if you have allocated the order line in This Session and want to unallocate you can simply use the Undo Line button instead (as explained shortly). When you select to Unallocate previously saved allocations, the This Session Allocate column to become a minus value to reflect what will occur when it is processed.
The final option on the Allocate Line menu is the Qty Allocated. This is useful if you want to enter a particular quantity to allocate to the sales order line rather than accept the automatic quantity which the software determines. If you reduce the quantity allocated from that which has been previously saved it will have a similar effect to the Unallocate option for the quantity specified eg place a minus quantity in the This Session Allocate column.
Pick Line
The Pick Line button provides the option to process, removing and changing the Picked quantity on the selected order line. Similar to the Allocate Line button you have the option to Pick a quantity on the line using the main button or click the green arrow to the right of the button to access the options to Unpick existing picked quantities and to change them. Picking is an optional intermediate step in the order processing workflow.
Dispatch Line
Click the Dispatch Line button to automatically calculate a Dispatch quantity on the selected sales order line. The quantity it will automatically attempt to dispatch is the Allocated quantity however where this is zero it will attempt to first Allocate and then Dispatch that quantity (taking into account previously dispatched quantities prior to this session). Please note : Whether a quantity can be dispatched is not based on available stock (as is the case when Allocating) but on actual stock and utilises the "Allow In-Stock Levels To Be Exceeded" setting in Company Preferences to determine how it is dealt with. If stock is not allowed to be exceeded (eg a strict stock control system) and there is not enough stock to be dispatched (regardless of whether stock has been allocated to the order or not) then the software will not allow a dispatch of more than the quantity physically in stock.
In addition to the main you have the green arrow on the right of the button. Click to get an additional option to specify a precise Dispatch quantity you want rather than accept the quantity the software selects for you (although you won't be able to override any of the stock level checks outlines above). Please note : Unlike Allocations you will not be able to reduce the Dispatch quantity below the quantity that has previously been saved as dispatched in a previous session for example to attempt to undo a previously dispatched quantity. Dispatches are represented in the software by Dispatch records (referred to as Delivery Notes) and these cannot be undone so the software ensures that you cannot reduce the Dispatch quantity.
Back Order Line
The Back Order Line button gives you the facilities to put an order line, or a partial quantity on an order line, on Back Order. Back Orders are useful to be able to track sales orders that cannot be fulfilled presently but can be in the future eg when stock is replenished. If an order line cannot be fulfilled and it is not put on back order, once the Due Date is passed on the order, the order line becomes marked as Unfulfilled.
Similar to Allocations, you can click the main Back Order Line button to have the software calculate the quantity for you. If Allocated is zero it will back order the entire outstanding quantity, if Allocated is not zero it will back order the remaining quantity. To cancel the quantity on back order on the order line or to enter a specific back order quantity click the green arrow to the right of the main button. The menu will give you the option to Cancel Back Order, which will cancel any previous saved back order quantities, and the option to enter a specific Qty Back Order.
Undo Line
The Undo Line button is used to undo the processing steps you have carried out in This Session on the selected line. When you click the button all quantities in the This Session band will be reduced to zero and all quantities in the Order Status will change to the currently saved quantities on the line. This is useful if you want to start again with processing the order line. It is important to note that this only undoes changes made in This Session and does not undo changes that are saved on the order line. To undo previously saved Allocated, Picked or Back Ordered quantities use the menu options on the respective buttons by clicking the relevant green arrow.
Status Panels
On the right of the Order Processing window you will see the status panels. The top panels relates to the selected sales order and the bottom panel relates to the selected order line.
Order Status
In the Order Status panel it displays the currently selected Order No., the Status of the selected order and progress bars showing you where you are up to for each step in the order processing workflow. It's important to note that the status and progress displayed are not related to what is actually saved for an order but what has been carried in This Session on the order. If you see a tick next to the selected order in the list then you know additional processing has been carried out to the order that is affecting the status and progress displayed.
Underneath the status, if any part of the order has been dispatched you will shown a section titled Order Dispatch & Invoice Info. This shows a list of all of the dispatches that have been processed for the order and these represent Delivery Notes that can viewed and printed. The Dispatch No. is displayed as a link which you can click to view and print the Delivery Note. If a dispatch/delivery note has been invoiced, the invoice number which was raised for the dispatch will be shown next to it. Again this will be shown as a link which you can click to view the respective invoice.
Order Line Status
The Order Line Status gives additional information specific to the selected order line in the list. It shows the current status of the individual and, similarly to the Order Status, this is based on both save processing changes and those made in This Session.
The Order Line Status shows the stock levels of the item on the selected line. It shows you the Allocated quantity and next to it, in green, it displays the quantity allocated to the order line. This is the quantity which is already saved and allocated to the line outside of the current session changes. Therefore if you see an Allocated quantity of 5 and 2 displayed in green next to it, you know that 2 of the 5 allocated are for this order line. The Available stock quantity is shown and next to it, in red, the quantity allocated to the line in this session only (showing you, of the quantity available, what will be allocated to this order line). If you have made no allocations to the line in this session the quantity will not show.
Similar to the Order Status panel, if there are any dispatches relevant to the specific it will list them and also the invoice number is it has been invoiced. You can click the links shown to view specific Delivery Notes and Invoices.
Saving Order Processing
Click either Save or Save & Close on the main toolbar to complete and save the processing carried out in the current session. This will show you the processing window and display the processing being carried out as it does it. If you have processed and Dispatches or Invoices in the session it will list them for you showing you the Dispatches/Delivery Notes on the left and the generated Invoices on the right.

Once it has completed, the software will enable you view the newly created Delivery Notes and Invoices and print or email them at that point. To print or email simply click the printer icon to the left of the document you want. To view them simply click the magnifying glass icon next to the document.
This window will show you all of the processed documents recorded since you opened the Order Processing window and not just those saved in the session. If you want to view the window to see all processed documents at any time before closing the Order Processing window click the View Processing button in the main toolbar.
The Abandon button in the main toolbar is used to undo all changes made in the current session. It is the equivalent of selecting Undo Order for each sales order that has been changed in the session.
*Available stock, in terms of limiting quantities that can be allocated to sales orders, is only relevant if you have the Allocate sales orders to available stock only setting ticked in Company Preferences.