Sales *
The Sales section is a control-panel which enables you to view a list of all of your sales document transactions and to access all of the features available for entering, printing, processing, enquiring and reporting on sales document transactions.
You can access the Sales section by clicking the Sales option in the main Options Bar at the top of the Avanti application window.
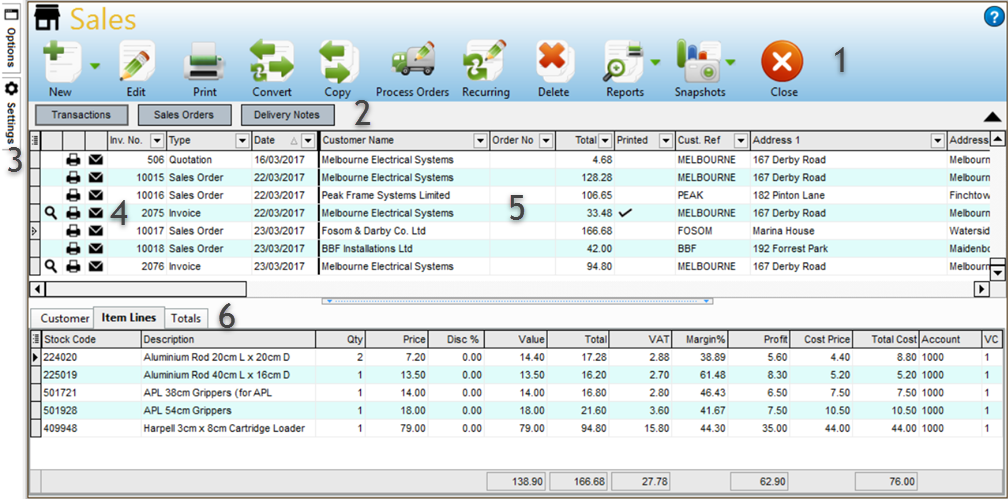
1) Toolbar
The Toolbar gives you quick access to the main options in the Sales section.
The New button is used to enter a new sales transaction.
If you click the main part of the button, to the left of the down-arrow, you can enter a new invoice transaction. If you click the down-arrow part of the button on the right you will be given a menu to select the type of transaction you want to enter and you can select accordingly. See Invoice Entry for more information.
The Edit button is used to view and/or amend the currently selected transaction in the main Sales list.
The Print button is used to batch print a range or a selected list of transaction documents. See the Batch Print page. For more information on selecting a list of transactions to print see the Multi-Select page.
The Convert button is used to convert a sales transaction such as a quotation, estimate or sales order** into an invoice or another type of transaction. See the Convert option for more information.
The Copy button enables you to copy the details of an existing transaction to a new sales transaction. See the Copy option for more information.
The Process Orders button is used to access the Order Processing window which is the hub for the SOP facilities in Avanti.
The Recurring button is used to setup template transactions which can be used to automatically generate recurring invoices at specified intervals. See the Recurring Invoicing topic for more information.
The Delete button is used to delete a range of transactions, a single transaction or a selected list of transactions. See the Delete option page. For more information on selecting a list of transactions to delete see the Multi-Select page.
The Reports button provides a drop-down menu of reports available specifically related to sales document transaction.
2) Select View
The Select View panel is used to select which list you want to display. You can display a full list of all transactions by clicking the Transactions button. This is the default option when you first open the Sales section. You can display a list of just Sales Orders by clicking the Sales Orders button. This is useful for when utilising the Sales Order Processing facilities. Click the Delivery Notes button to view a list of Delivery Note records. These are separate to transactions such as invoices and sales orders and are the records generated through the SOP facilities (specifically the Order Processing window) whenever a sales order is dispatched. You can print and email delivery note documents just as you would with transactions and you can also use the Document Designer to design delivery note document layouts.
3) Pop-Out Task Bar
The pop-out task bar is a quick and easy way to view and access all of the options available in the Sales section. You just roll your mouse over the Options or Settings tabs on the left-hand side of the Sales section and after a second the panel will pop-up from the left. If you mouse-over the Options tabs you will see all of the options available for you to select from. If you move your mouse away it will pop back into it's tab.
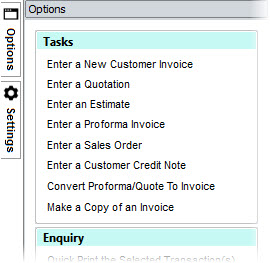
Options
There are three sections in the Options tab, Tasks, Enquiry and Snapshots. Tasks gives you all of the types of common tasks you can carry out. Enquiry gives you all of the options to print and enquire about sales transactions and to produce reports. Snapshots is used to select any of the snapshots available for the Sales section. For more information on Snapshots see the Dashboard section.
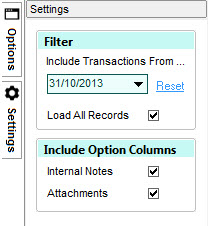
Settings
The second tab is Settings which contains a number of controls to let you define how the list of transactions operate.
Each setting is explained below :
Include Transactions From ...
Select or enter a date to filter the list of transactions in the Sales section. All transactions before the date specified in this box will be excluded from the Sales transactions list. Using this filter option you can ensure that only more recent transactions are included in the transaction list so that the list is more relevant and, importantly, that the Sales section operates as fast as possible by not needing to load every sales transaction you have entered into the list each time. If you need to go back and view older transactions you simply set this date back or click the Reset link to set it back to 01/01/2000. This date is saved on a per-company basis and will be retrieved and used each time you open the Sales section for the company you are using. The date you select here will be displayed in the top-right above the Sales list so all users are aware that a date filter is active.
Load All Records
If this checkbox is ticked (which is the default setting) it indicates that you want to load every sales document transaction into the list each time the Sales section is loaded. If you have a particularly large number of transaction records that have to be loaded and refreshed each time you may find that it can take a longer time to load all of the records into the list. If you feel that it starts to take an unacceptably long time to load all of the records into the list you can turn off the Load All Records setting by unticking this box. The software will then only load 200 records into the list at a time, thereby speeding up loading time massively. The list will load more records only as you need them ie by scrolling through the list. You should be aware however that this places limits on some of the functionality of the list. For example as not all records are loaded into the list, features such as column sorting and searching are limited in functionality and often will force a loading of all records thereby negating the speed benefit available. However if you feel that loading speed is preferred to having these features available then this setting offers a way to achieve this. To gain the most benefit you may find that simply setting the Include Transactions From ... date (explained above) to filter the list of transactions based on date is most effective.
Include Option Columns
The other options in the Settings tab are included in the Include Option Columns panel. These are checkboxes which enable you to display whether additional information is available for each transaction in the list. These are Internal Notes and Attachments. If you tick either of these boxes then an additional column is added to the left of the list with an icon shown in each if a transaction has that information included.
Internal Notes
Tick the Internal Notes checkbox if you want to display a column showing which transactions have internal notes. Internal notes are additional information which you can add to a transaction for internal reference as opposed to standard notes which are generally used as information for the customer. If you tick this box you will see a new column in the Sales list showing a Clipboard icon for any transaction which has internal notes. Internal notes can also be marked as important and if so are shown with an exclamation mark in the clipboard. You can also click the new column next to a relevant transaction to add, edit or view internal notes. See Internal Notes for more information.
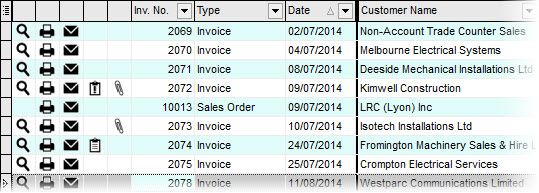
Attachments
Tick the Attachments box if you want to display an additional column showing which transactions have attachments. You can attach any number of files and/or web-links to each transaction in the Sales list and if you tick this box you will see a new column showing a paperclip icon for any transaction which has one or more attachments. You can also click the new attachments column next to a relevant transaction to add, view, open or remove attachments. See Attachments for more information.
4) Quick Lookup, Print & Email
At the left of each transaction there are three columns which contain icons. Clicking any of these icons enables you to perform a quick task on the selected transaction.
Lookup 
Click the magnifying glass in the first column and you will be able to drill into the details of the selected transaction. This enables you to view details such as the accounting information behind the transactions such as the journal entries, the VAT breakdown and the payment allocations. This only applies to sales document transactions which have an equivalent transaction in your accounts and therefore does not apply to sales orders, estimates, quotations or proformas ** etc.
Quick Print 
Click the second column which contains the printer icon and you can quickly print the selected transaction. This will display the Quick Print window where you can select the layout you want to print. See the Quick Print page for more information.
Quick Email 
Click the third column which contains the envelope icon and you can quickly email the selected transaction. This will display a window to select the layout you want to email and you can then specify the recipient's name and email addresses. The customer's details will be entered for you by default. See the Quick Print page.
Internal Notes 

Internal notes enable you to maintain optional internal information about any transaction. If an icon appears in this column for a transaction it indicates that a transaction has internal notes stored for it. If it has an icon which is an exclamation mark this indicates that the internal notes are marked as important. Regardless of whether a transaction has existing internal notes or not, clicking this column will enable you to add, view or edit the transaction's internal notes. See Internal Notes for more information on adding notes. See the section above on how to switch on the Internal Notes column if the column is not shown.
Attachments 
The attachments column shows a paperclip icon if the transaction has one or more a file or web link attachments. Regardless of whether a transaction has an attachment or not, clicking this column for a transaction will open the Attachments window for you to add, view or open attachments for the transaction. See Attachments for more information. See the section explained above on how to show the Attachments column if it is not shown.
Quick Printing or Emailing Multiple Transactions
The Quick Print and Quick Email facility provides a great way to quickly print or email a transaction. However it also offers the facility to cherry-pick and select any number of transactions that you require and to use the Quick Print function to print or email all of the selected transactions in a single step. To do this you will use the Multi-Select facilities in the Sales list to pick all of the transactions that you want to print or email. For how to select a list of transactions see the Multi-Select page. Once you have selected all of the transactions you want to print or email, right-click on any selected transaction and select Print Transactions or Email Transactions from the pop-up menu. The transactions you selected will then be passed in to the Quick Print facility for you to carry out the required process. See the Quick Print page for more information.
5) Transaction List
Displays a full list of sales transaction. The list which is displayed is dependent on the view selected using the buttons above the list (as explained in section 2).
You can customise the list in various different ways including moving columns, sorting the list by a particular column, filtering the list based on your own criteria, displaying more columns or hiding existing columns and more. See the Customising Lists section for more information. Any customisation you carry out on the list is saved, specific to you, so it is displayed in the way you set it the next time you use the Sales section.
You can also access additional options for the Sales section by right-clicking on the list and a pop-up menu will be displayed. This is just another way to get at many of the options available in the Sales section.
An additional option available on the pop-up menu is the Attachments option. Selecting this option will open the Attachments window enabling you to add, view, open and remove file and web-link attachments for the selected transaction. See Attachments for more information.
The options at the bottom of the right-click pop-up menu, starting from Group By This Field, are standard options for all lists in the software (see Customising Lists for more information). The option at the bottom of the menu is Export which enables you to export all of the information in the list in several formats including Excel, CSV and HTML.
6) Detail Split-Panel
The panel at the bottom of the Sales section is used to display the full details of the selected sales document transaction. As you move through transactions in the main list the information displayed in the Detail Split-Panel will refresh to display the details of the current transaction.
The Detail panel contains three tabs, Customer, Item Lines, Totals. The Customer tab displays information regarding the customer and general information about the transaction. The Item Lines tab shows all of the lines on the transaction display stock info, description, price, quantity, discounts, totals and profit margins. The Totals tab displays the full totals of the transaction as well as settlement discounts and carriage charges.
You can hide the Detail panel, if you prefer to expand the list and display more transactions, by clicking the horizontal split-panel bar underneath the transaction list (as shown below).

To show the Detail panel again click the split-panel bar which will now be displayed at the very bottom of the Sales section. You can resize the details panel by clicking the split-panel bar and dragging it up or down to position it how you want. The display of the Detail panel will be saved and used the next time you open the Sales section.